
For the users of the Meridian Multimedia Platform
What is Meridian Prime Multimedia ?
The Meridian Multimedia Platform is a website dedicated to teachers and students of primary and secondary schools. It’s a step towards a modern and more open education model based on professional and verified teaching materials, and at the same time using and learning to use various external sources consciously.
It allows one to move away from the currently dominant way of teaching and implement interactive methods, engaging the student in the cognitive process.
The shared content is mainly maps, depending on the subscription purchased for subjects such as Geography, History, Social Studies and Biology.
Some of the materials are didactic boards—but because their use is analogous to maps, in the further part of the tutorial we use the term „Maps”.
Access to Meridian Prime Platform
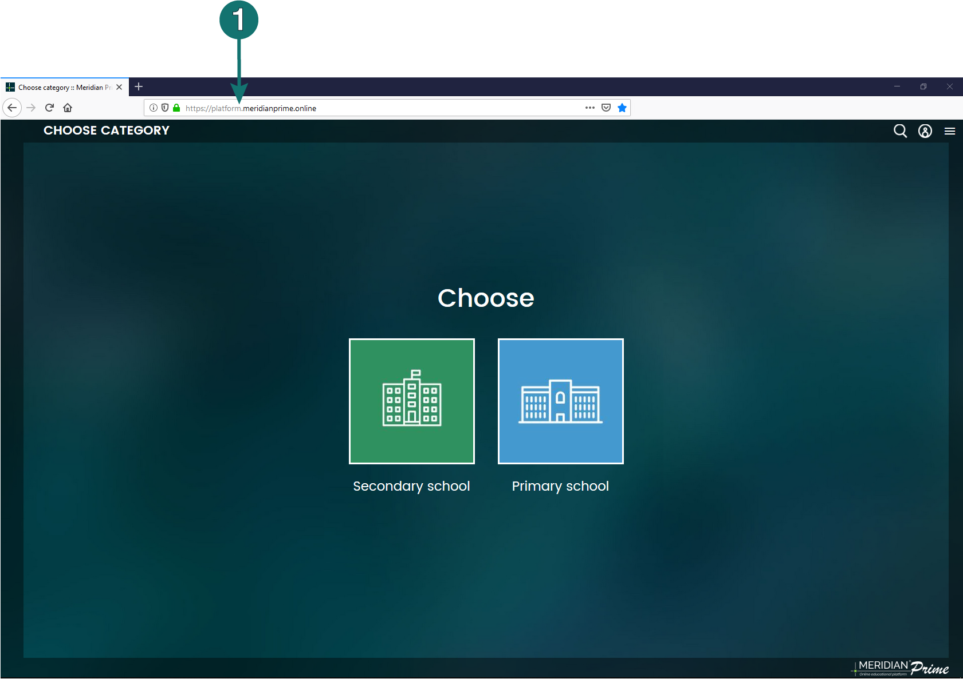
To use the Meridian Prime Platform, go to your web browser at platform.meridianprime.online 1 and then log in to your profile or register as a new user.
Registration
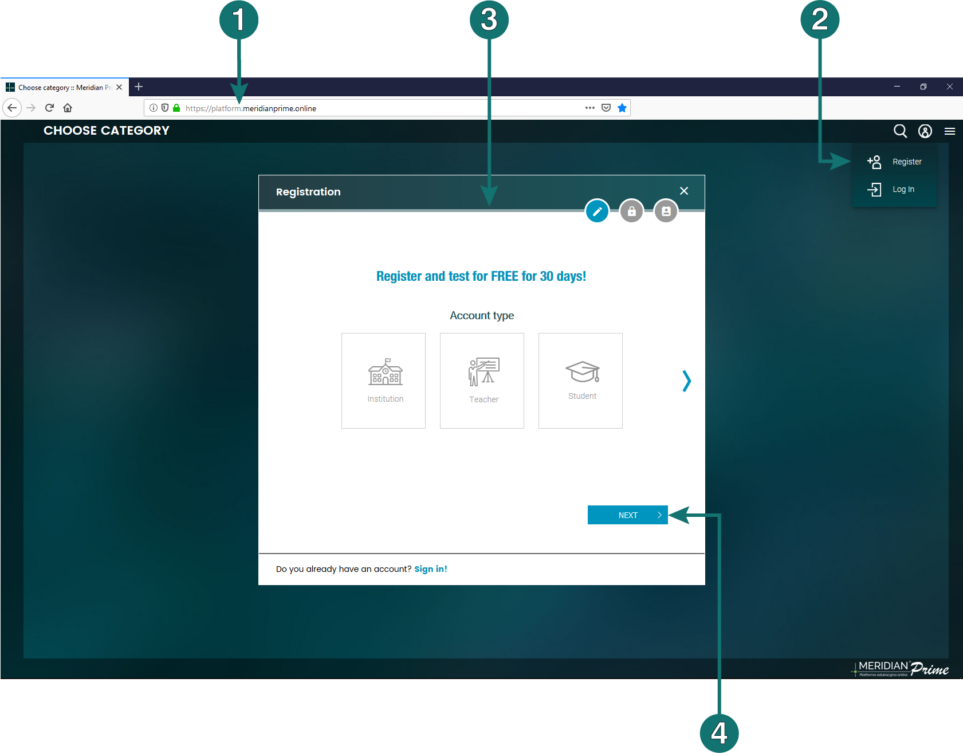
In order to sign up as a new user on the Platform, open the page platform.meridianprime.online 1 in a web browser, click the icon ![]()
![]() and then Register 2.
and then Register 2.
The pop-up form 3 allows you to set up one of three types of accounts: Institution, Teacher or Student. After selecting the given account type and pressing the button 4, we move to the completion of the email address and the password 5.
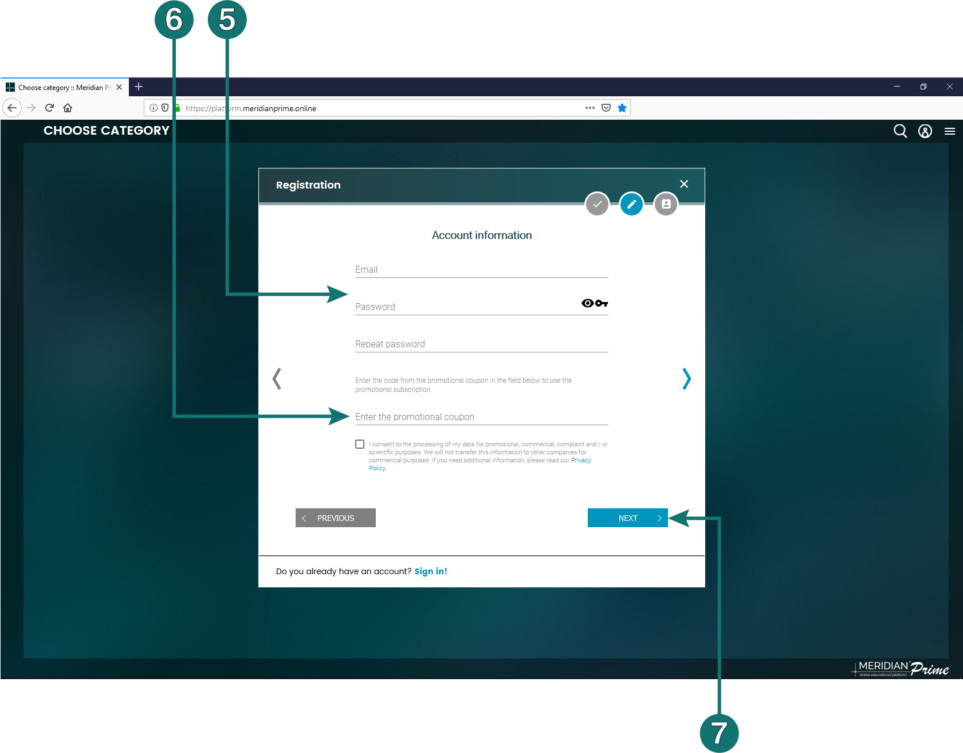
If you have a coupon (promotion code), enter it in the appropriate field 6. Otherwise, this field should be left blank.
After pressing the button 7, we move to the last stage of completing personal data and the school data 8.
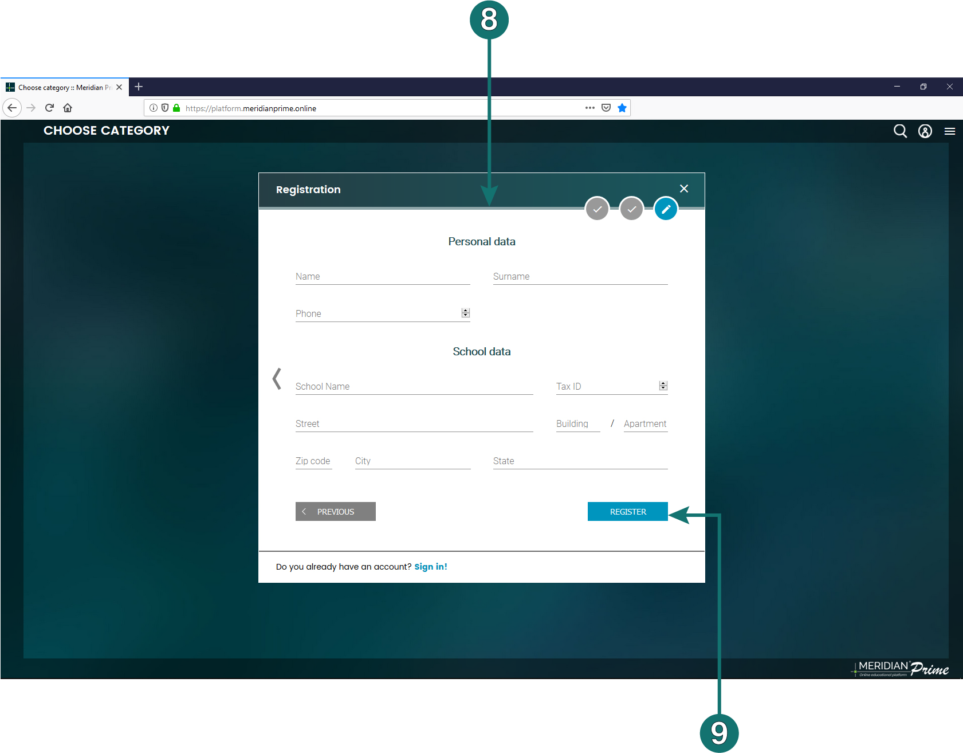
NOTE: The data necessary to provide will be slightly different, depending on the previously selected account type.
After pressing the Register button 9, a message will be sent to the email address, providing you with a link which must be clicked in order to fully activate your account.
Logging into the Platform
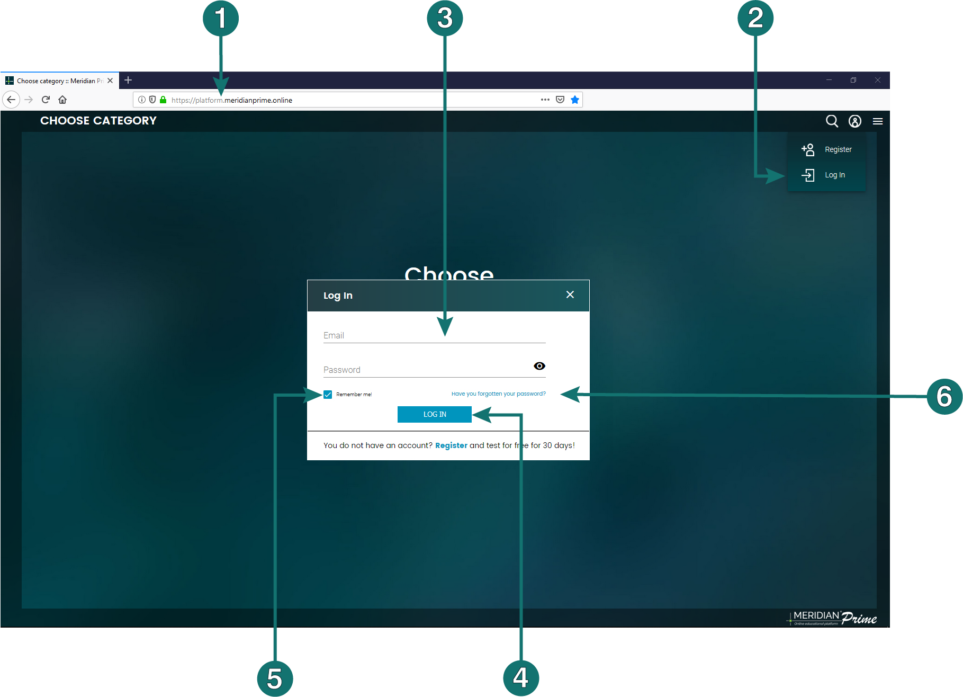
In order to log into the Platform, open the page platform.meridianprime.online 1 in a web browser, click the icon ![]()
![]() and then Log In 2.
and then Log In 2.
Then—in accordance with the data used during registration—fill in the Email and Password fields 3 and press the LOG IN button 4.
Selecting the Remember me! 5 option allows you to save the login data on your device, causing you to log in automatically the next time you launch the Platform.
It is also possible to reset the password. To do this, click the Have you forgotten your password? 6 in the login window and provide your email address.
NOTE: the email address must be the same as the one provided during registration.
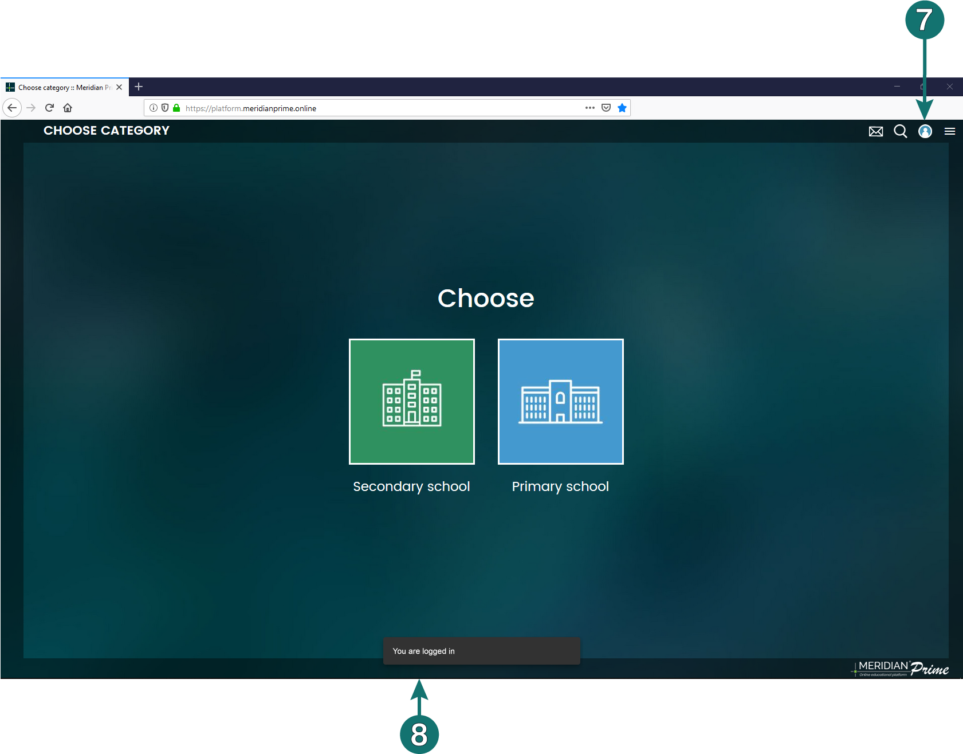
Proper login is indicated by the color change of the icon 7. The message You are logged in 8 is also displayed at the bottom of the screen for a few seconds.
Using the full-screen mode
We recommend using the Platform in full screen mode.
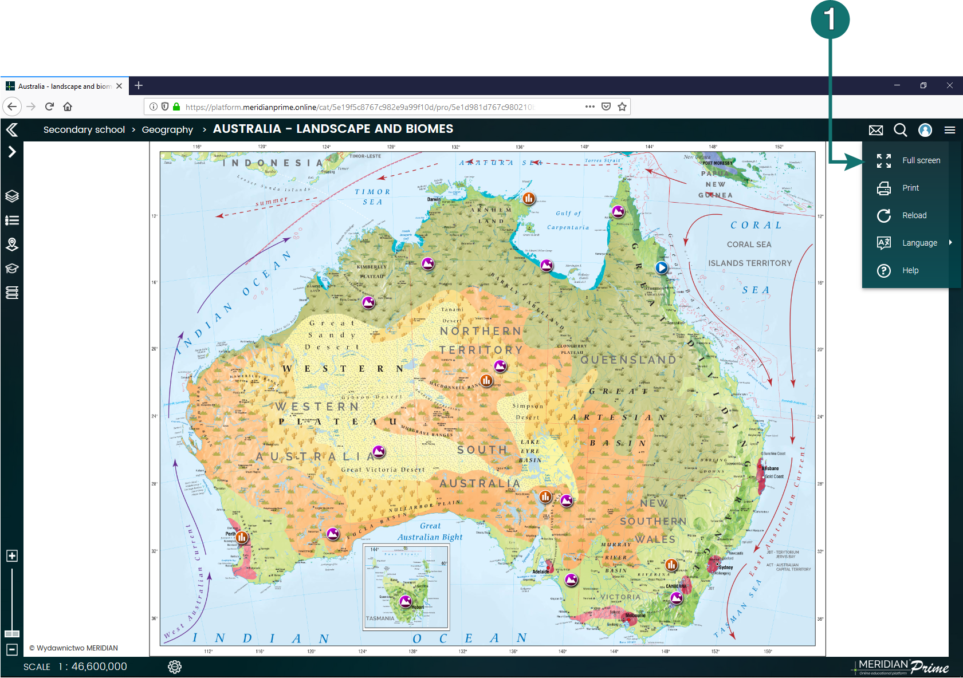
In this case, you need to click the icon ![]()
![]() and then Full screen 1.
and then Full screen 1.

Likewise, in order to exit the full-screen mode, click the icon ![]()
![]() and then Exit the full screen 2, or press Escape on your keyboard.
and then Exit the full screen 2, or press Escape on your keyboard.
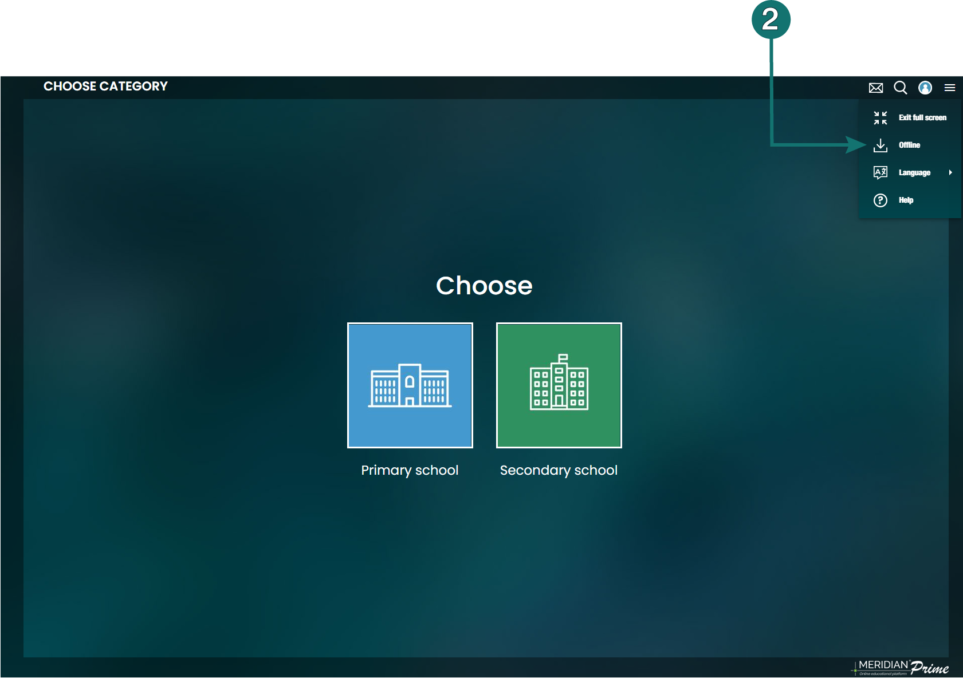
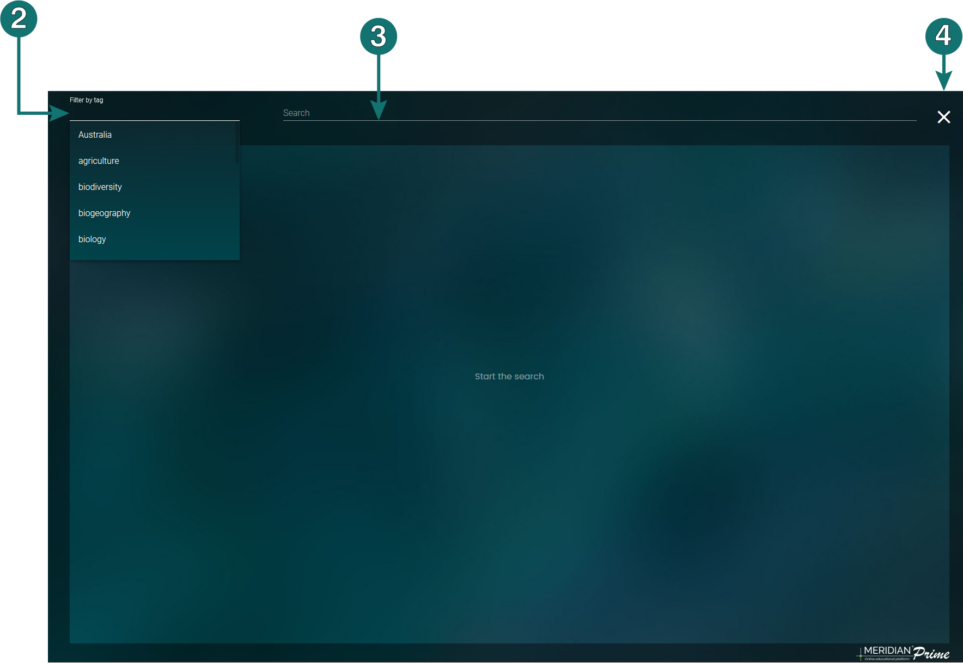
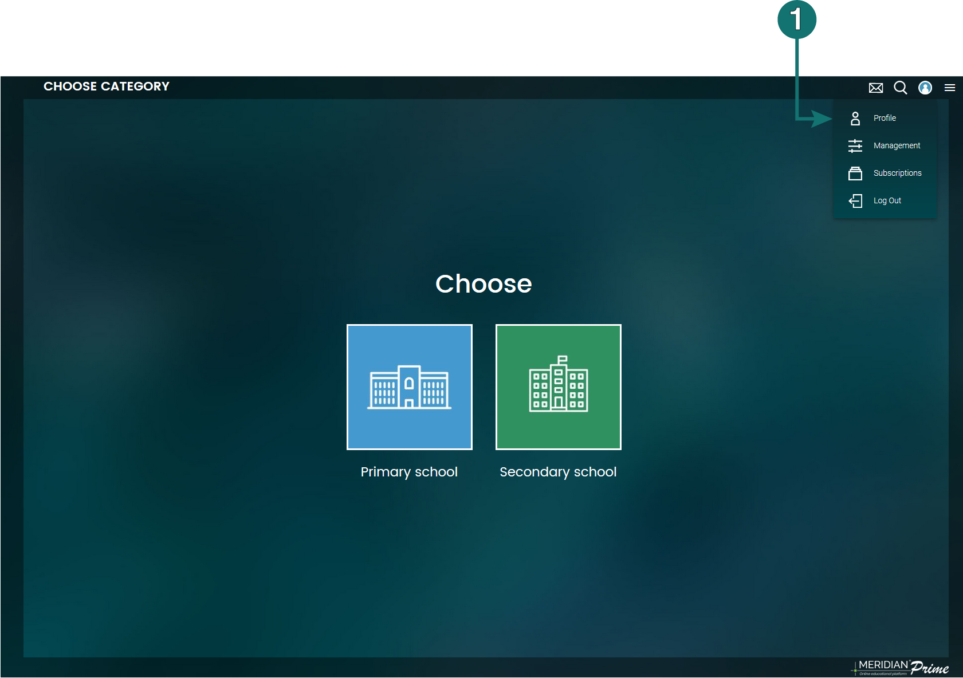
Choice of the teaching level
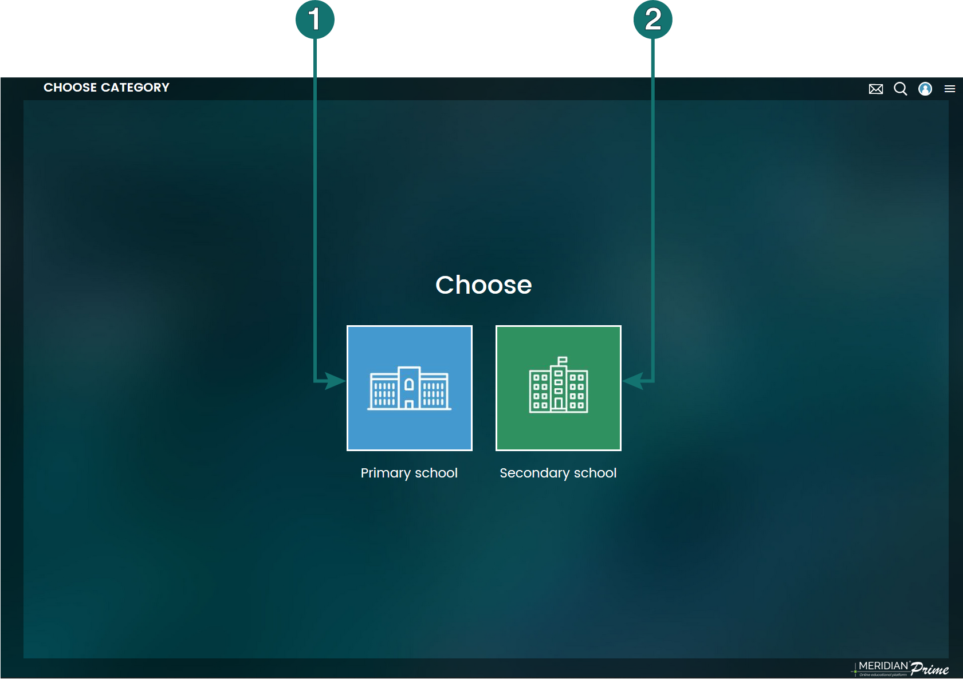
After entering the Platform, the user has the option to choose between two levels: primary school 1 and secondary school 2.
Selecting the map
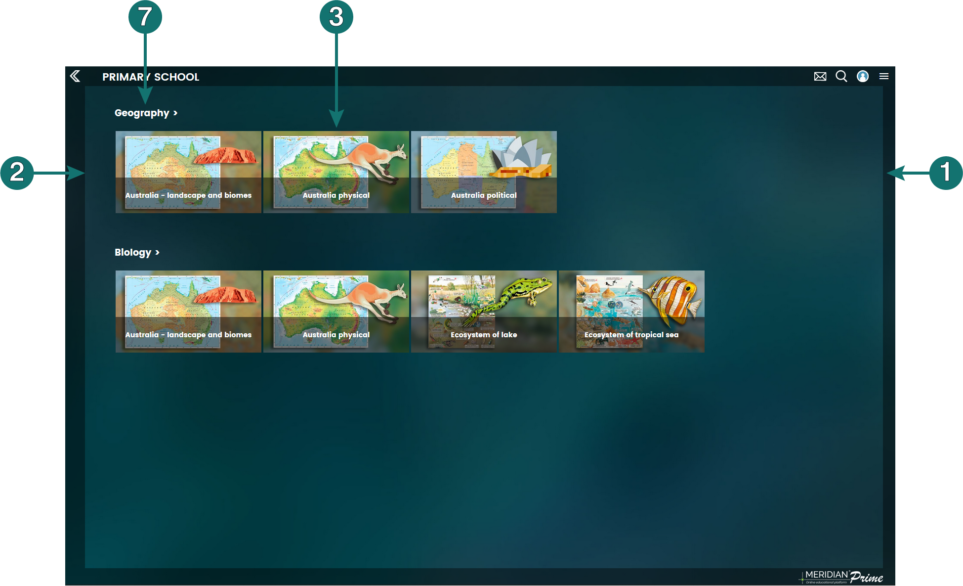
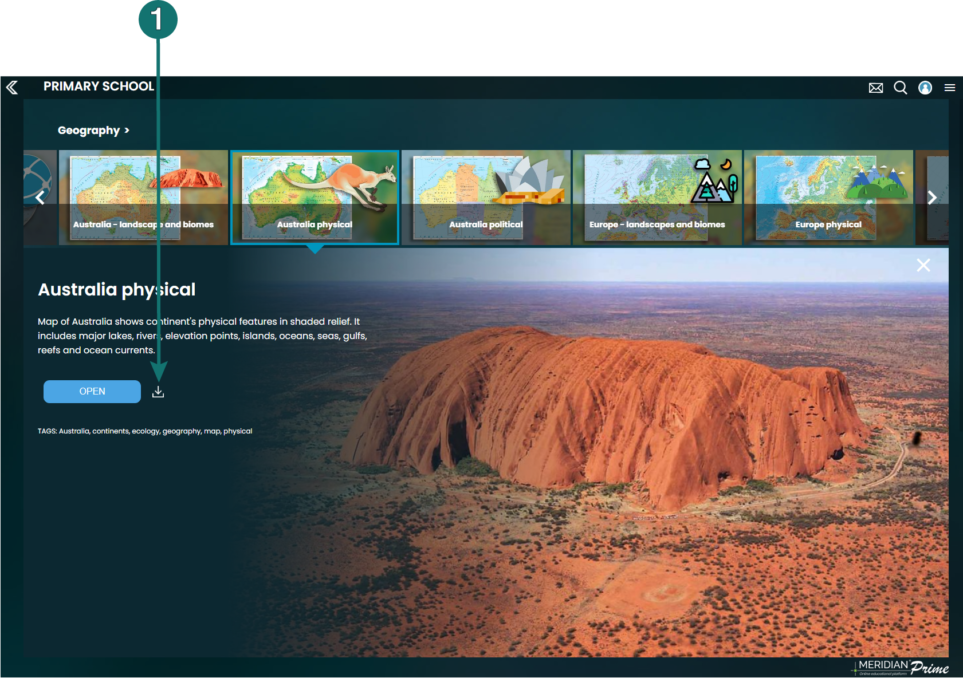
After selecting the teaching level, the user can choose the map they are interested in.
They are grouped by subject (Geography, History, Biology, Social Studies) and you can scroll through the thumbnails using the Forward 1 and Back buttons 2.
Clicking on the thumbnail of the selected map 3 expands its description.
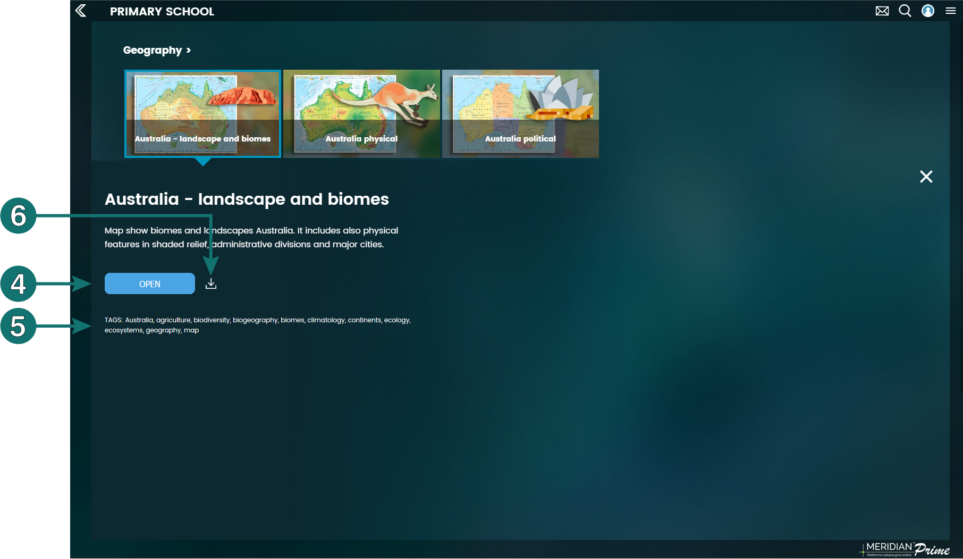
After clicking the Open button 4, the map will start to download.
In addition, below the Open button are keywords or tags associated with the map 5, using which the Platform can be searched.
The users of Chrome and Opera browsers have an additional option of downloading the map 6 and then using it offline (i.e. without internet access). This feature is especially useful in establishments where problems with the Internet connection occur.
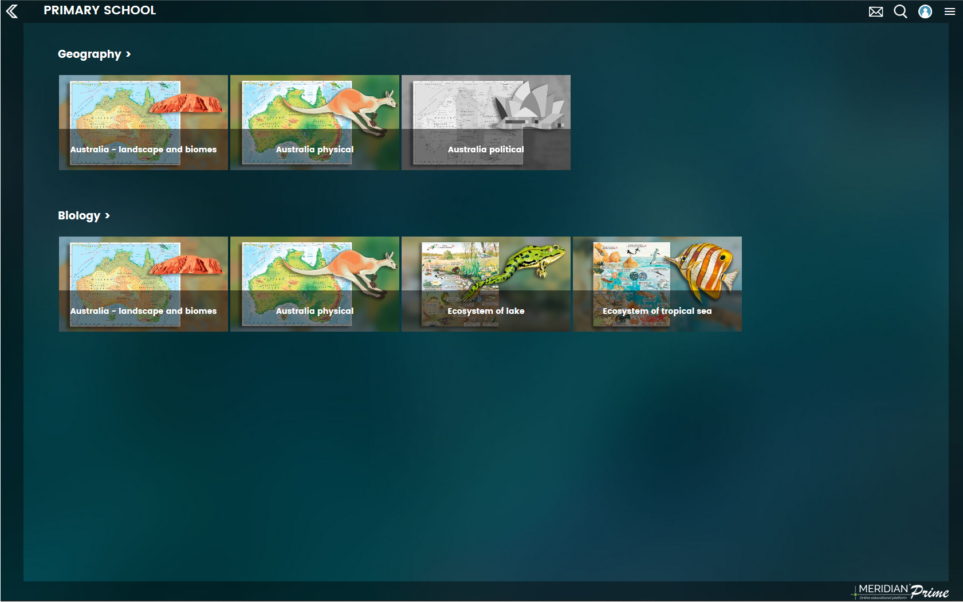
Note: if you purchased the selected subject package, maps from other subjects are not available and their thumbnails are displayed in shades of gray.
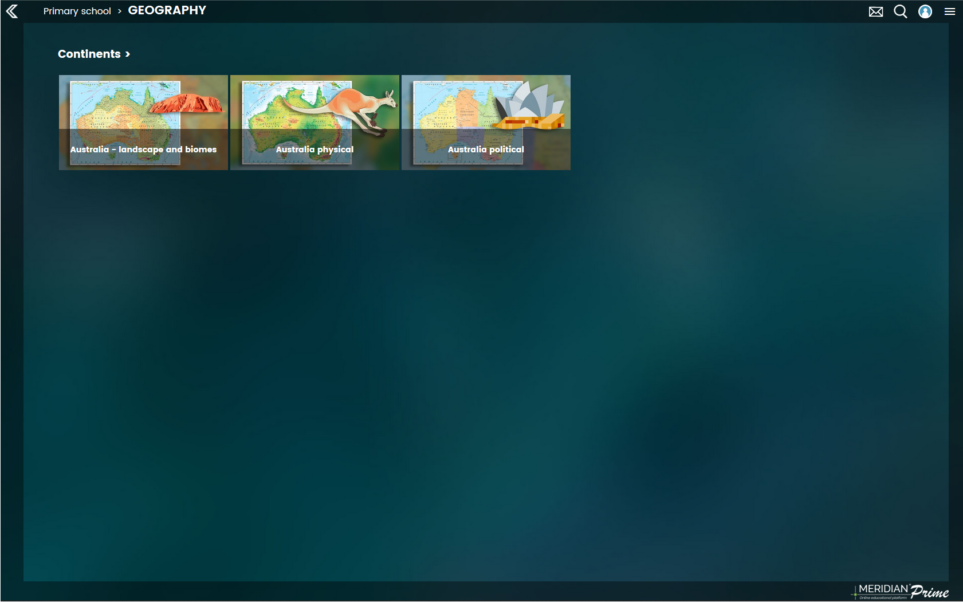
Another way of selecting the map is choosing the subject of interest first 7. Then, the view will divide into subcategories.
Navigating the Platform: using the upper menu bar

At each stage of using the Platform, the user is informed what they are viewing. This function is fulfilled by the menu visible at the top of the browser window 1.
The user has an option of clicking on the menu’s individual positions and using it to navigate the Platform.
The button 2 is used to retreat one level.
Downloading and processing the map
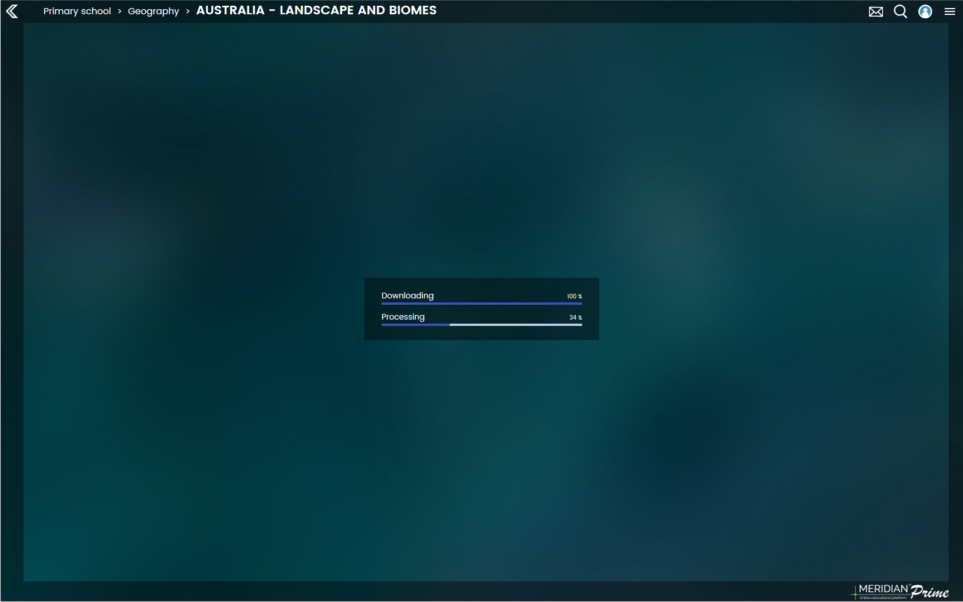
What follows after selecting the map, is its downloading and processing.
Depending on the hardware configuration, internet connection speed and map complexity, the process can take from several seconds to several minutes, and does not require any additional actions.
Note: The first download and processing of the map may take several minutes. Each subsequent map launch will be much shorter (from a few to several seconds), because it will not be necessary to process it again.
Re-downloading with processing may occur if you clear your browser's cache or the content on the Platform gets updated.
In order to display the maps available in the offline mode, click the icon ![]()
![]() followed by Offline 2.
followed by Offline 2.
It will trigger the option of signing in. Choose the Log In button 3 and enter your e-mail address 4.
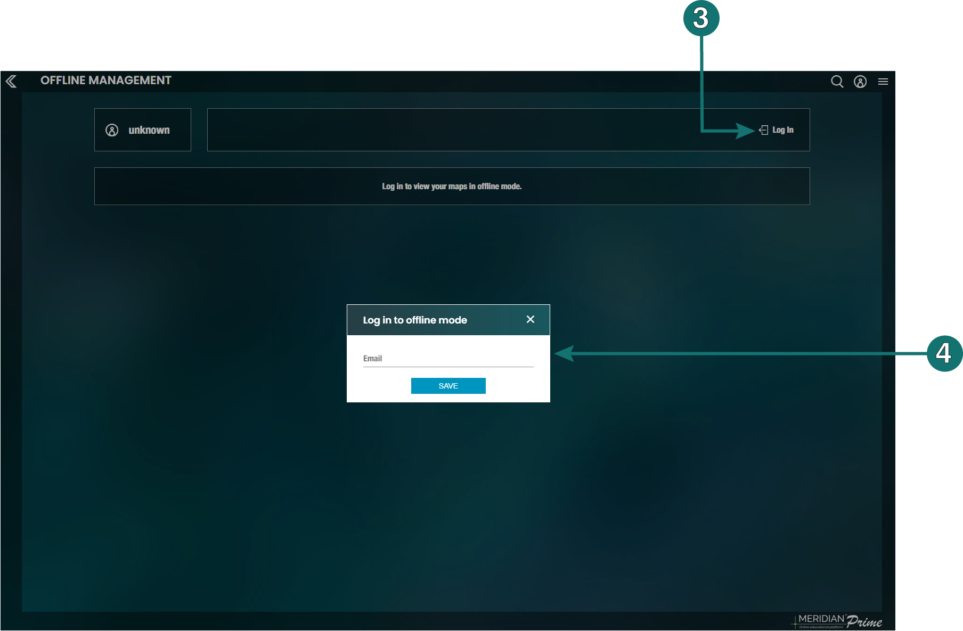
After logging in, a list with all the downloaded and available offline maps will be displayed.
In order to open a map, choose the button 5 and then Open 6.
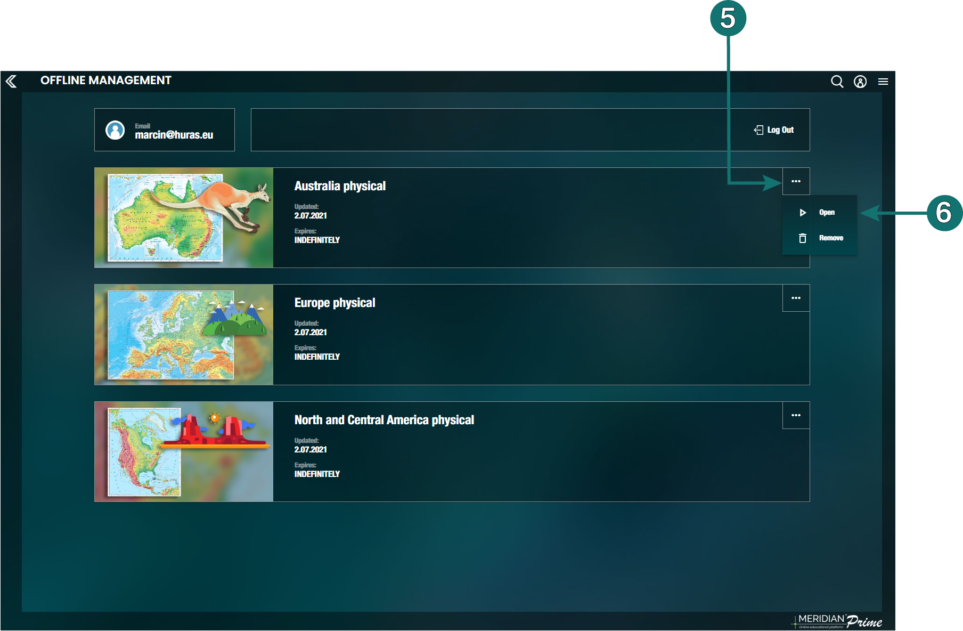
Warning: The maps available in the offline mode are ascribed to the computer on which they have been downloaded. They get deleted automatically in the process of clearing the browser’s cache, or the expiration of the subscription.
Map view / overview
After the map loads, the next step will appear in the browser window:
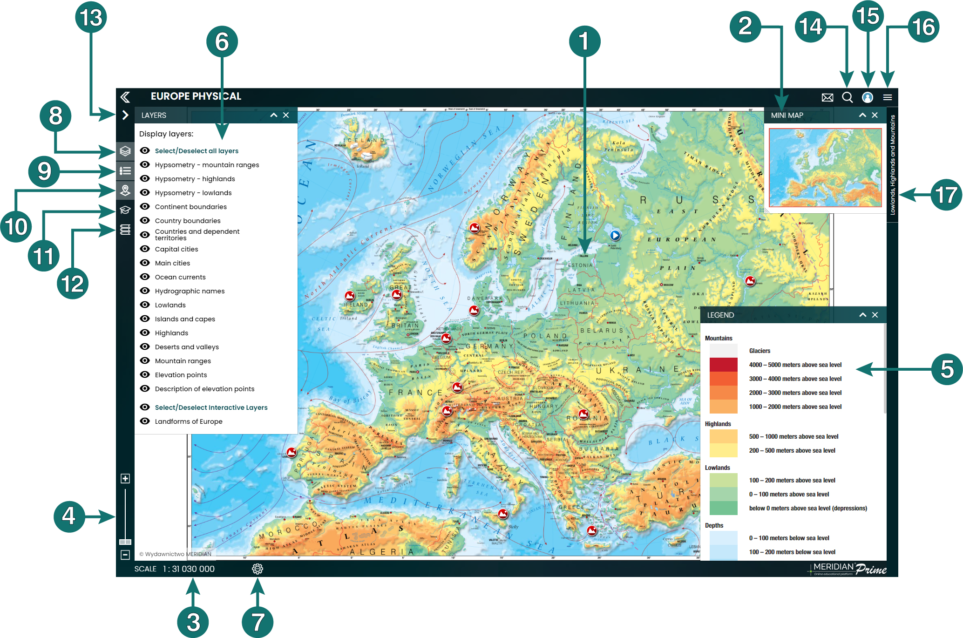
1 The main map view.
2 Mini map: this is a window specifying the position of international maps in relation to the entire map.
3 Scale: displays the current map scale.
4 Slider (scroll): necessary to change the current scale size, i.e. zoom in / out of the map (for more on this topic, see Zooming in and out).
5 Legend: displays and describes the elements placed on the map. If all legend elements do not fit in the window, it can be moved using the slider on the right. Legend items are displayed depending on the layers enabled. The legend window can also be enlarged / extended vertically.
6 Layers: this is a window for switching on / off the map’s layers. To turn on / off the visibility of a given layer, click its name on the list.
7 Settings: the button is used to display a window with the settings for the correct scale conversion (more about this in the Settings section).
8 Button for switching on / off the visibility of the Layers window.
9 Button for enabling / disabling the visibility of the Legend window.
10 Button for switching on / off the visibility of the Mini map window.
11 Button for enabling / disabling the visibility of the Instructions module. This module contains tasks and questions to be solved based on a given map, prepared by methodologists and consultants. They can be done in class or considered as homework for students.
12 Button for enabling / disabling visibility of the Bibliography module. This module contains a list of verified, reliable source pages related to a given topic. They allow us to supplement and deepen knowledge in the field of issues discussed on the map.
14 Search engine button (more on this topic in the section Searching for maps).
15 Button for switching to profile edition or logging in / out of the Platform.
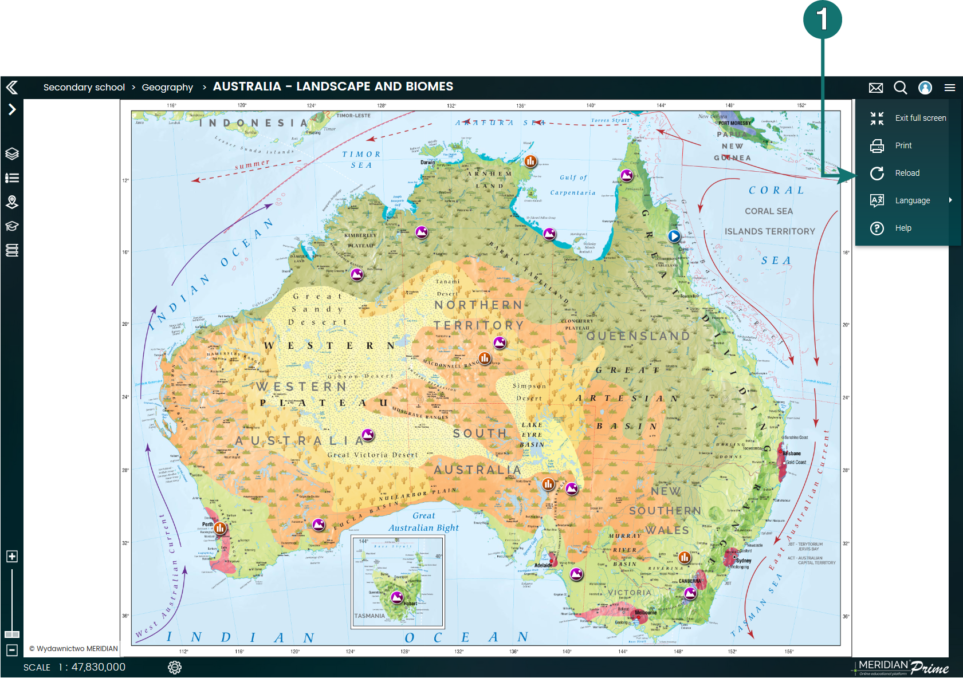
16 Button for switching to the full-screen mode, printing the map or reloading (more on this in the section Working in full-screen mode, Printing the map, Reloading the map).
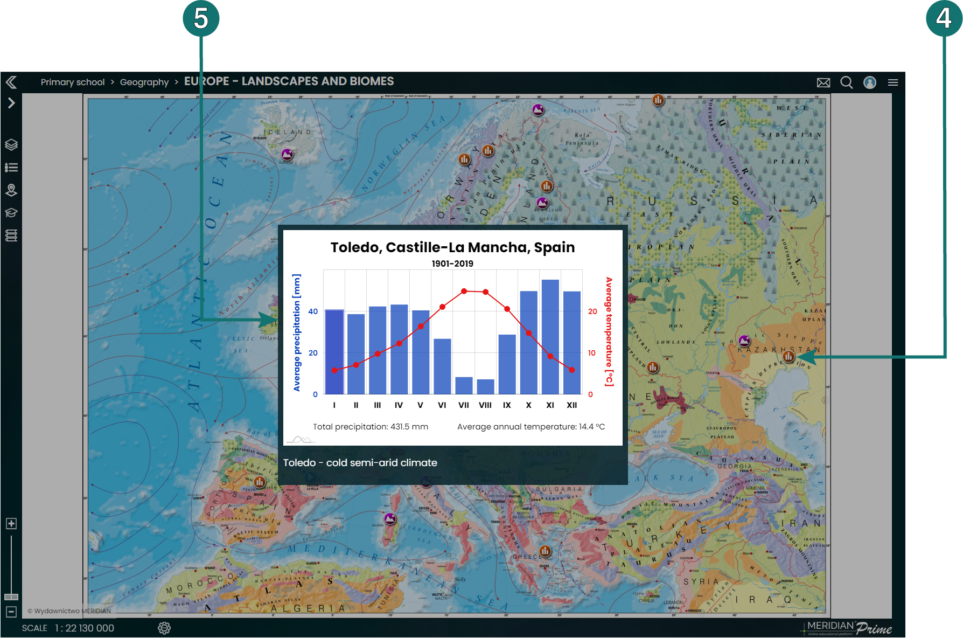
17 The side panels (if they have been elaborated for a given map) contain interactive diagrams pertaining to chosen issues presented on the map.
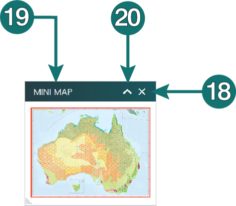
All windows can be turned off with the X in the upper right corner 18 and their position can be changed by clicking, holding and moving the name of the window 19 with the mouse tab.
Additionally, it is possible to reduce the window to a bar with a header using the arrow button 20.
Having the loaded map we can zoom in, zoom out and move it.
Zooming in and out of the map
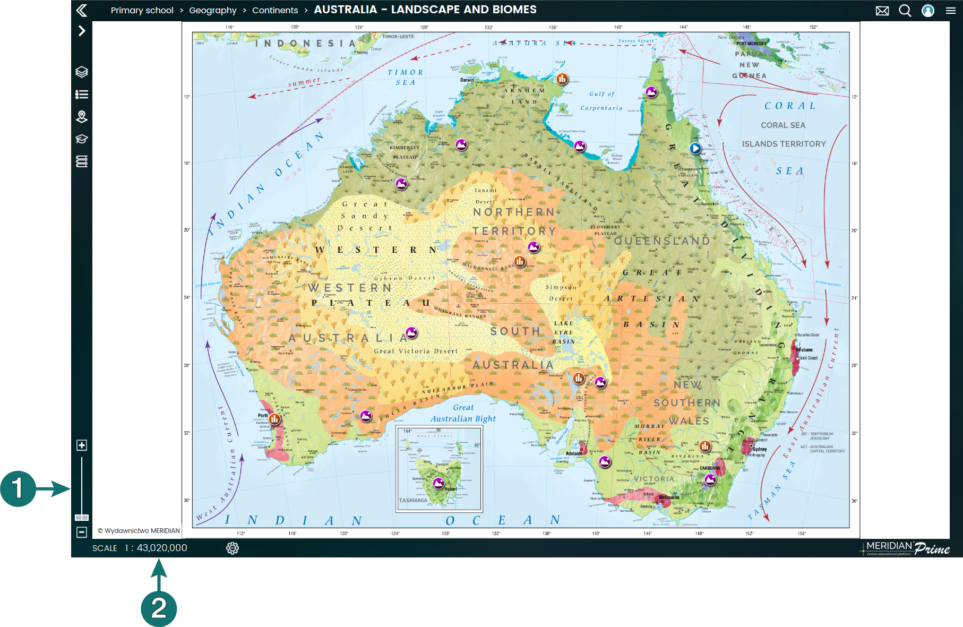
The map can be enlarged or reduced using:
- the scale slider 1: located in the lower left corner of the window with a map view.
- the mouse scroll wheel.
- by „pinching” the screen - if the map is displayed on a device with a touch screen.
The scale 2 changes along with the map size.
Moving the map
The map can be moved using:
- a mouse: by pressing its left button and dragging the map to the desired place.
- a finger or a pointer: if we’re displaying the map on a device with a touch screen.
Editing the map
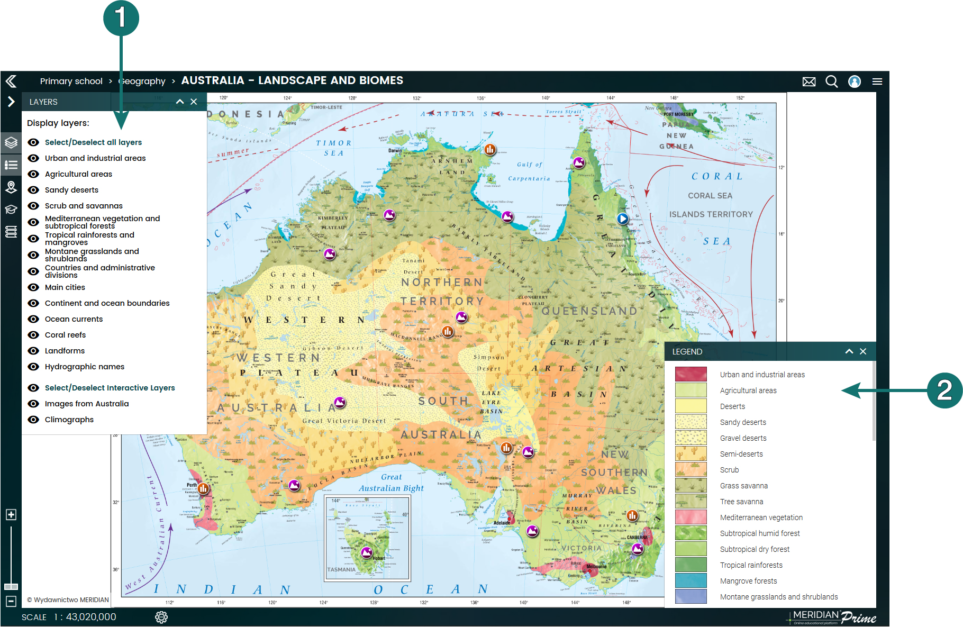
The Layers 1 panel allows you to create your own map by selecting the displayed items. Each map has its own set of available layers depending on the type, theme and generalization. The Legend 2, due to being connected to the Layers panel, only explains the elements selected for a given map configuration.
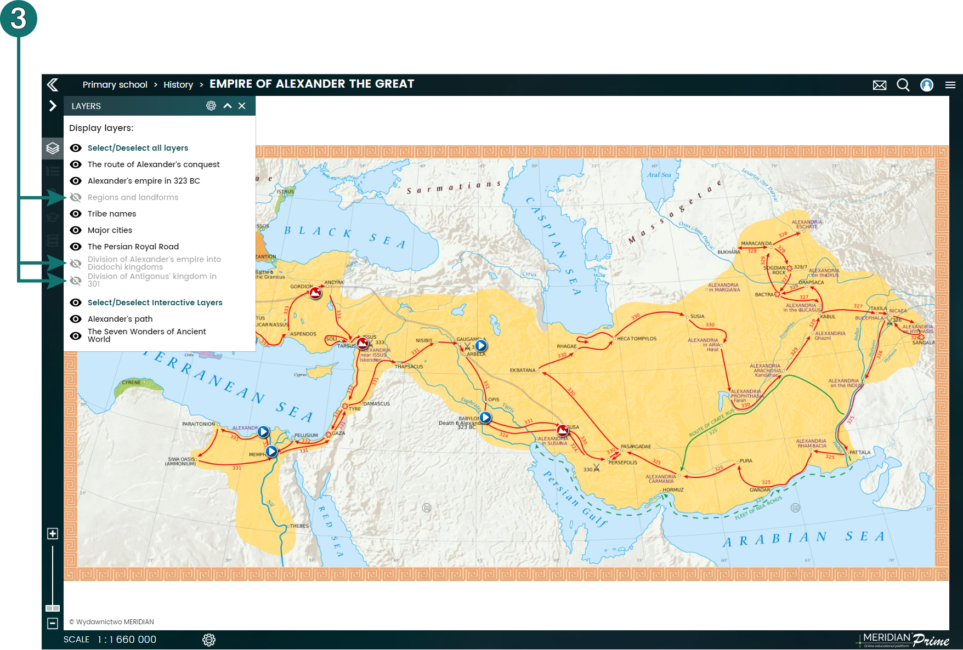
Some maps contain layers which visibility gets automatically turned off right after the map finishes loading. These are marked with grey color. In order to turn on their visibility, click the icon 3.
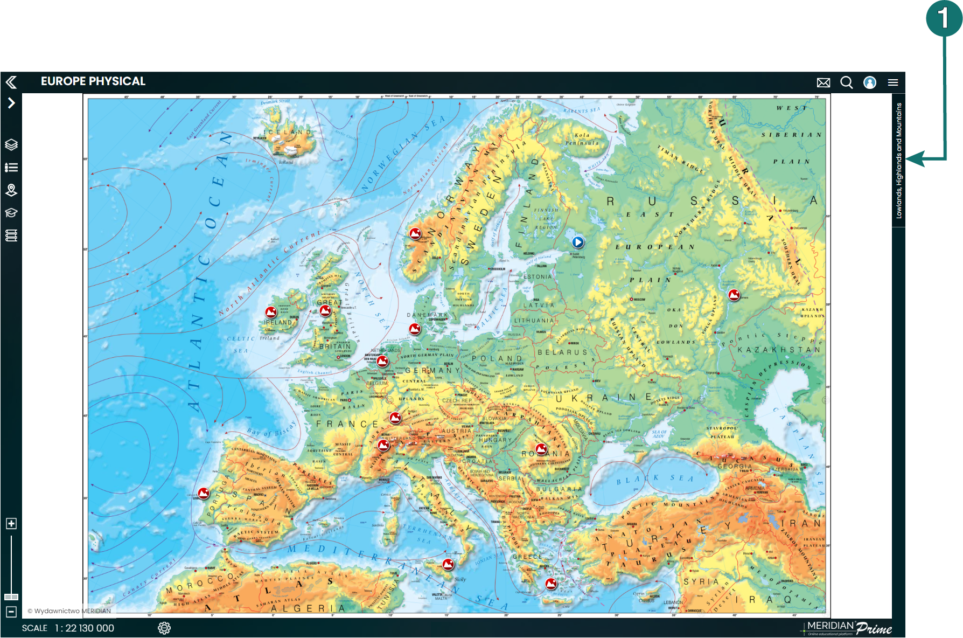
Interactive points
The Interactive points are used to display photos, animations, videos, descriptions and audio recordings related to a given map.
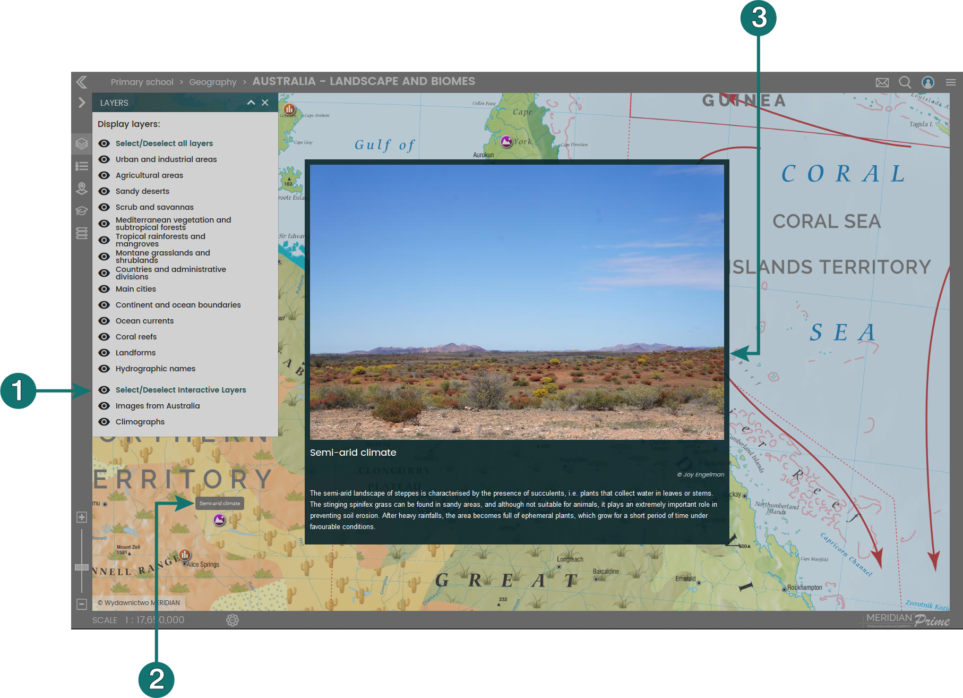
Interactive points are automatically displayed on the map after it finishes loading. To control their visibility (on / off), use the Layers window by clicking on the name of the layer with interactive points. It is always the last group of layers on the list 1.
Hovering over the interactive point will display its name 2, and after clicking, the full multimedia content with a description will show 3.
To turn off information about a given point, click anywhere outside of the interactive point window.
Adding your own interactive points
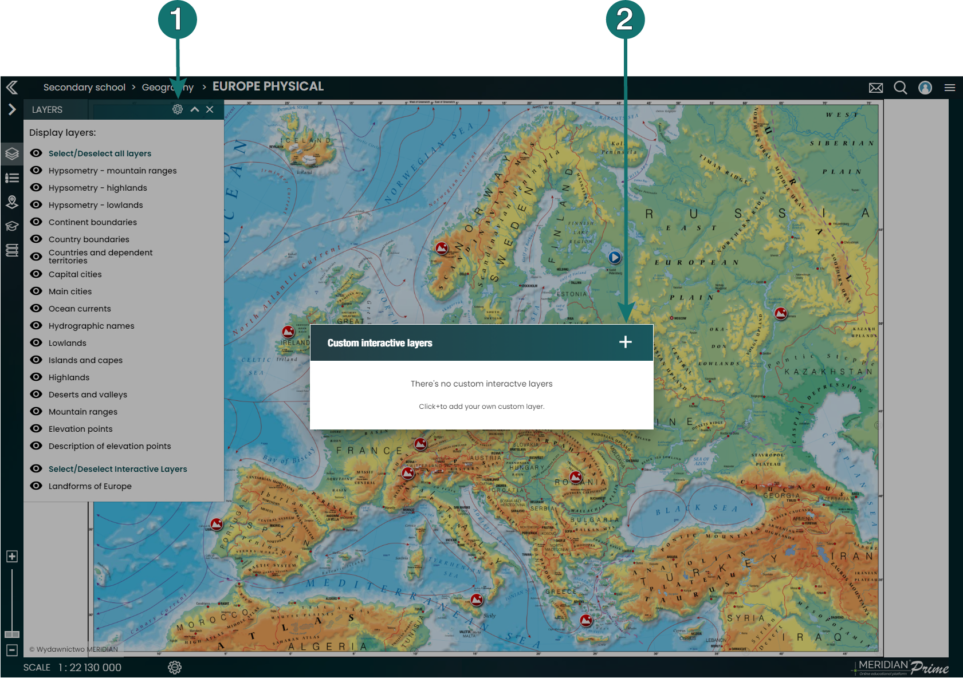
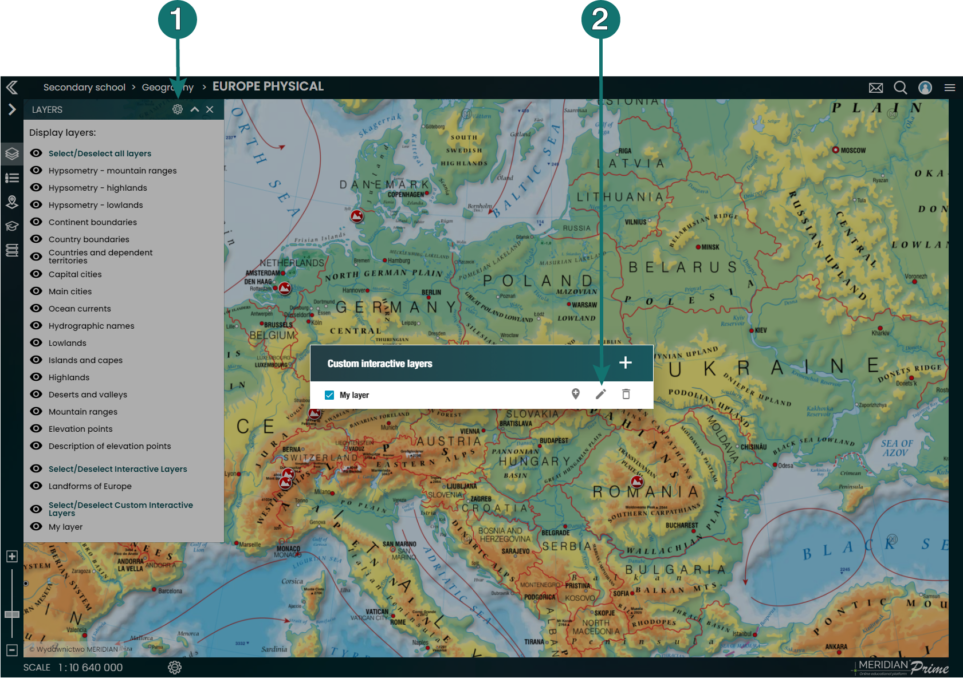
The teacher is granted the option of adding their own interactive points. In order to do this, one should click the icon 1 in the Layers panel, and then 2 add an interactive layer, if such hasn’t been created before.
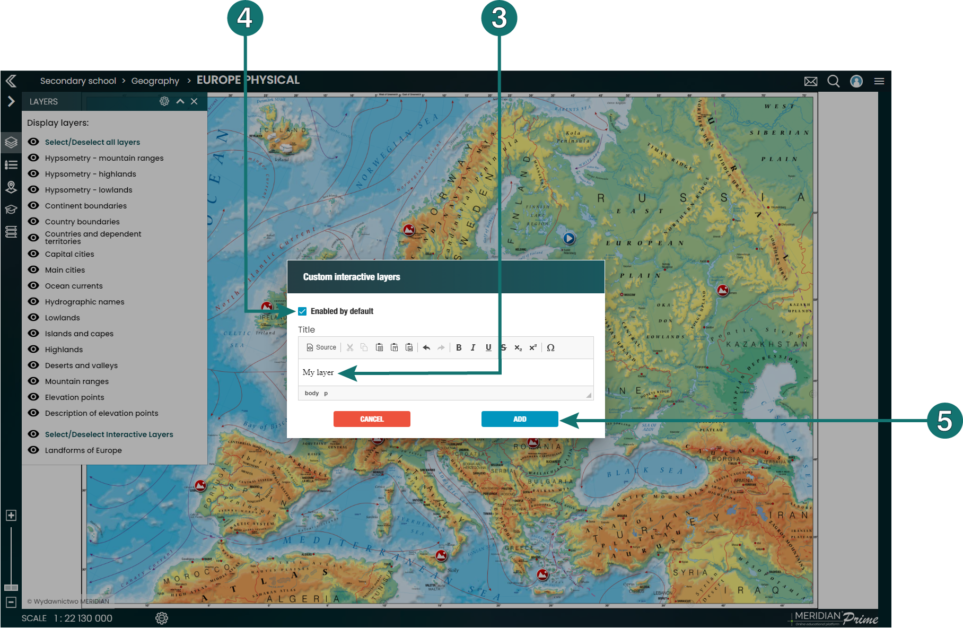
The interactive layer must be given a name 3 and it’s possible to precise whether the layer should be automatically visible after loading the map 4. Creation of the layer becomes finalized with the button Add 5.
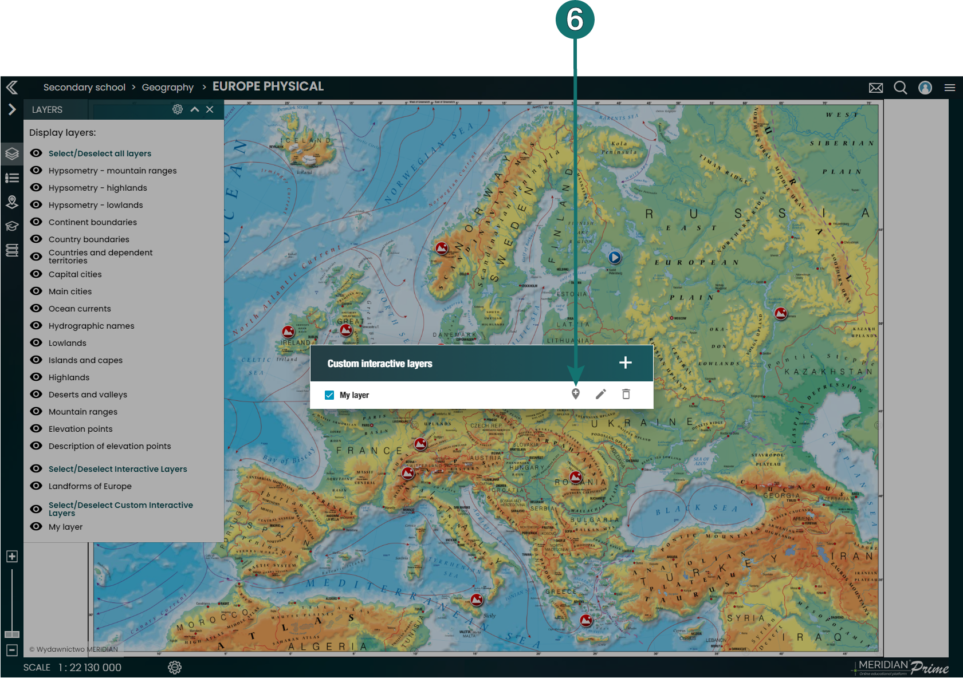
After creating the interactive layer, one is free to add their own interactive points. In order to do that, click the button Edit interactive points next to the layer’s name 6.
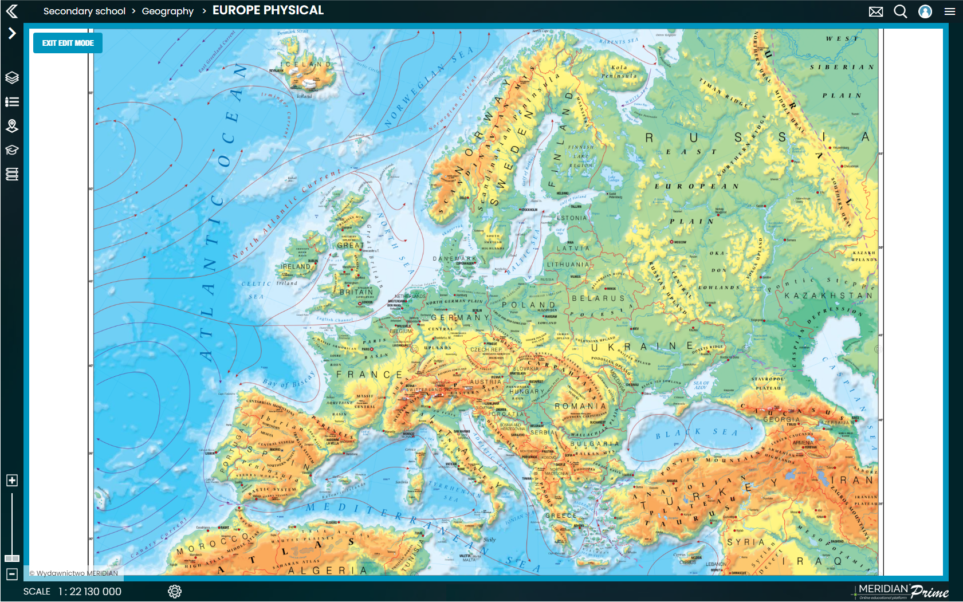
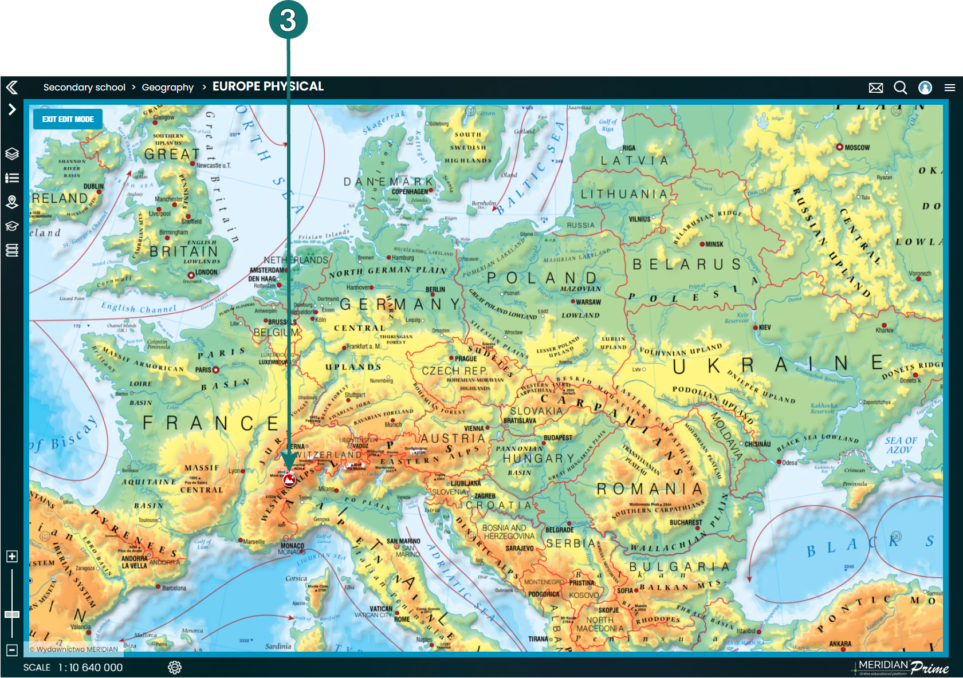
This allows you to enter the editing mode. After clicking on the map the place where we want to add a singular point, the creator window pops up.
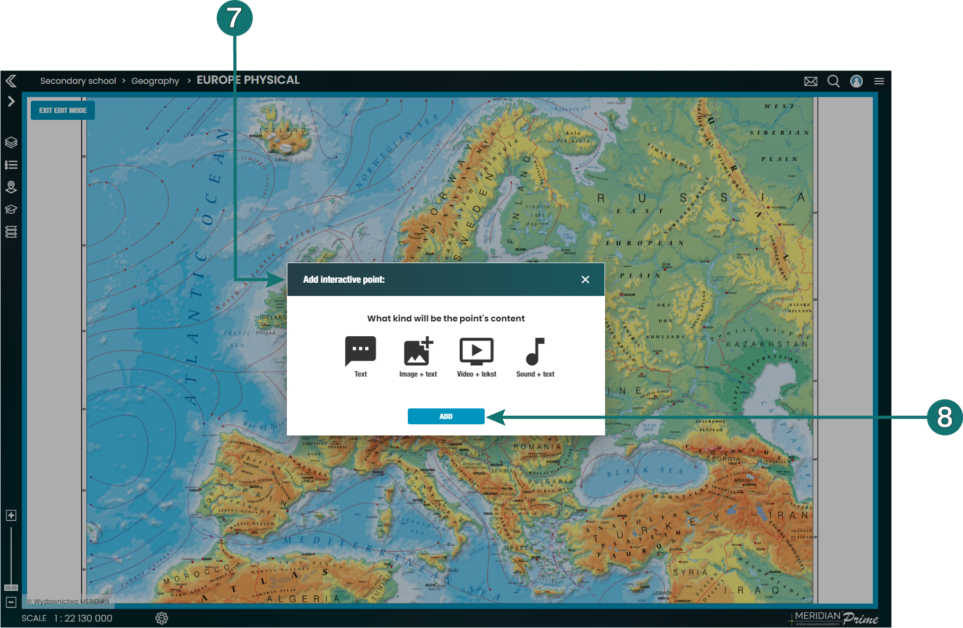
It’s possible to add written content or files — graphic, video or audio 7. After choosing the desired content, we click on the button Add 8.
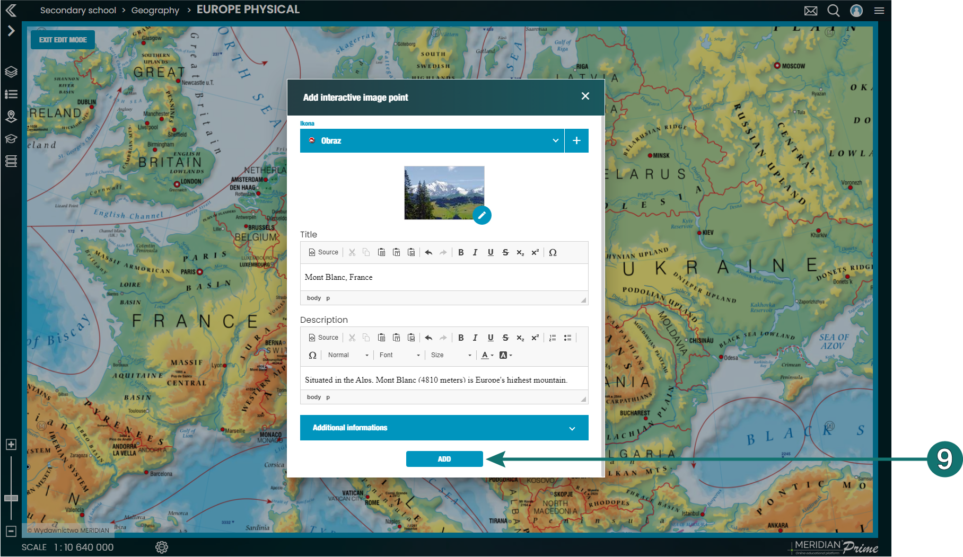
After filling out the content of an interactive point (the example includes an image and text), click the button Add 9.
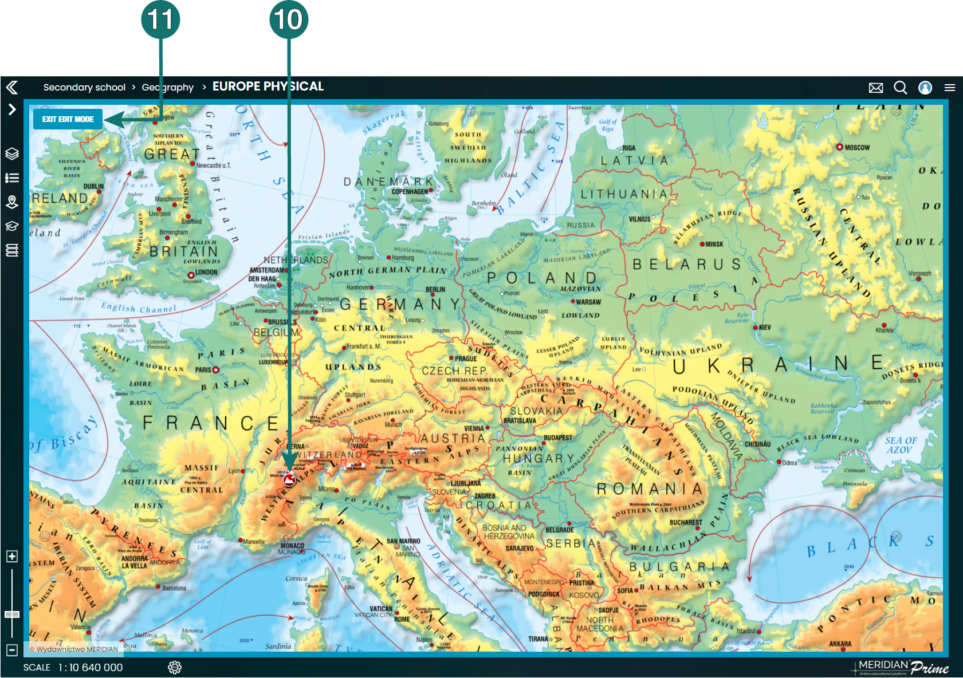
The interactive point shows on the map 10.
In order to exit the edition mode, click the button 11.

The previously added interactive layer shows in the list of layers, along with its points 12.
NOTE: Self-made layers and interactive points are saved in the profile information, which lets the user access them by logging from any device.
Modification and deleting of self-made interactive points
It is possible for teachers to modify their own interactive points. In order to do that, click the icon 1 in the Layers panel, followed by 2 in order to enter the editing mode.
When it comes to editing the existing interactive points, click 3.
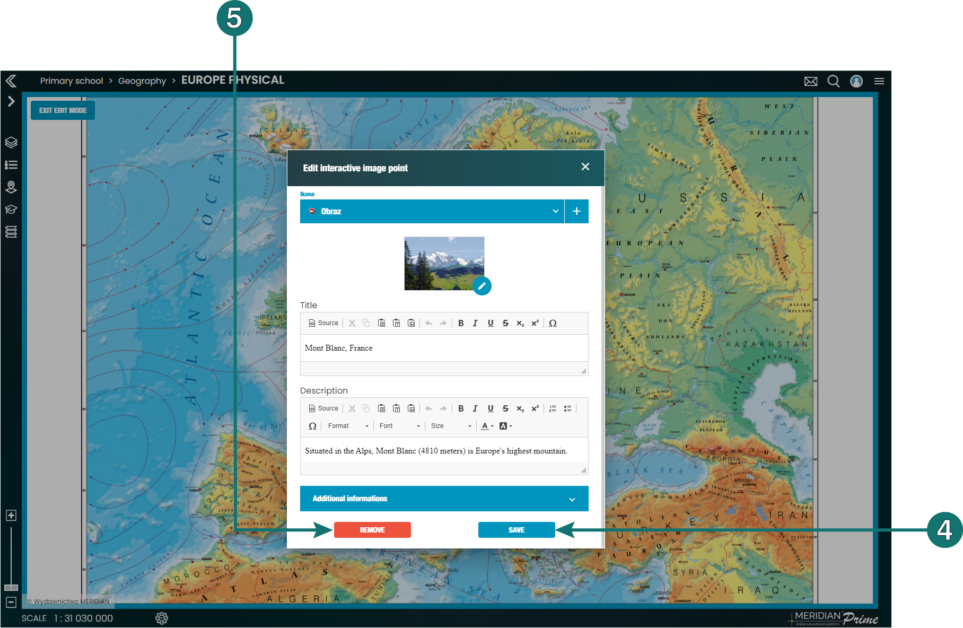
It will result in a window that permits you to change the content of an interactive point. In order to confirm the changes, click the button Save 4.
Clicking the button Delete 5 will result in deleting the interactive point.
Deleting of the interactive layers

In order to delete an interactive layer, click the icon 1 in the Layers panel, followed by the icon 2.
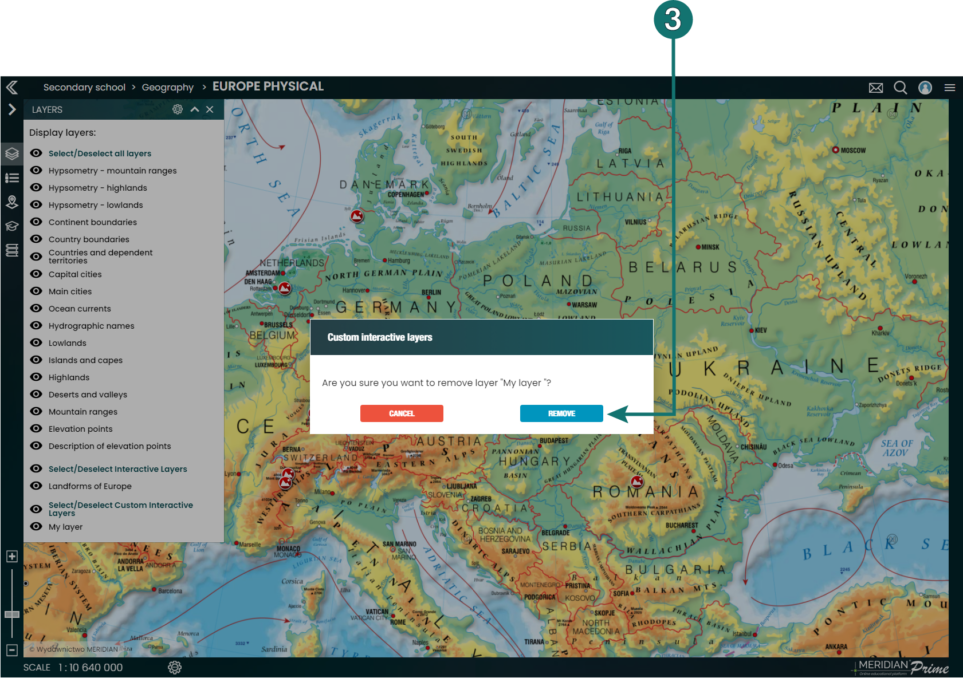
This choice should be confirmed by pressing the button Delete 3.
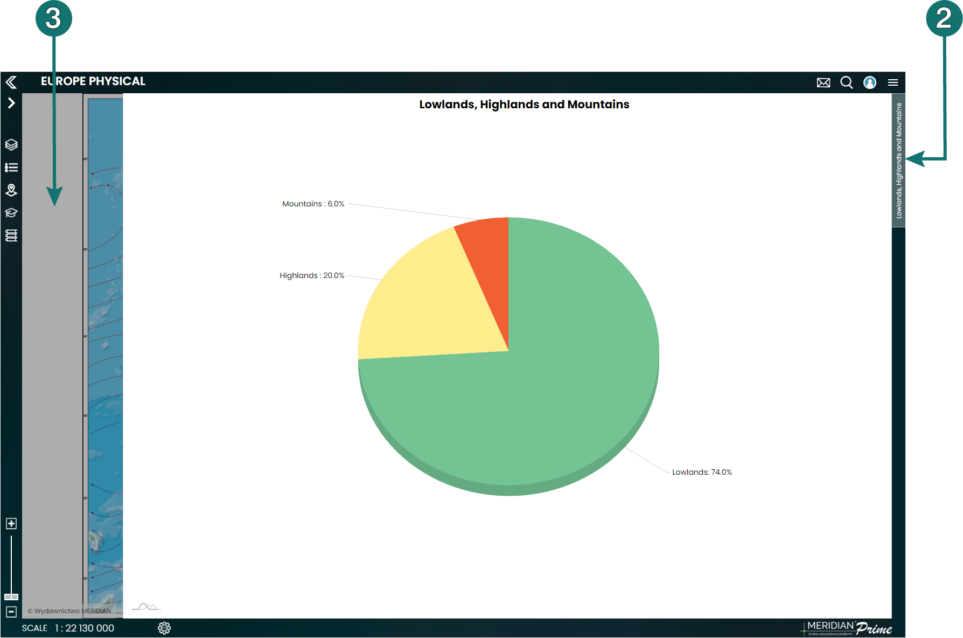
Interactive diagrams
If a map possesses interactive diagrams, the user can display them from the level of the side panel 1 by clicking on a selected title.
This will result in a diagram showing up above the map’s area. In order to close it, click on the button with the name again 2, or anywhere beside the pop-up window of the panel 3.
Diagrams can also be contained in the interactive layers. They are indicated by the icon 4, clicking which opens a window with a diagram 5.
The diagrams contained in the maps are interactive, i.e., animated, and show additional content after clicking on particular elements or hovering over them.
The Instructions Module
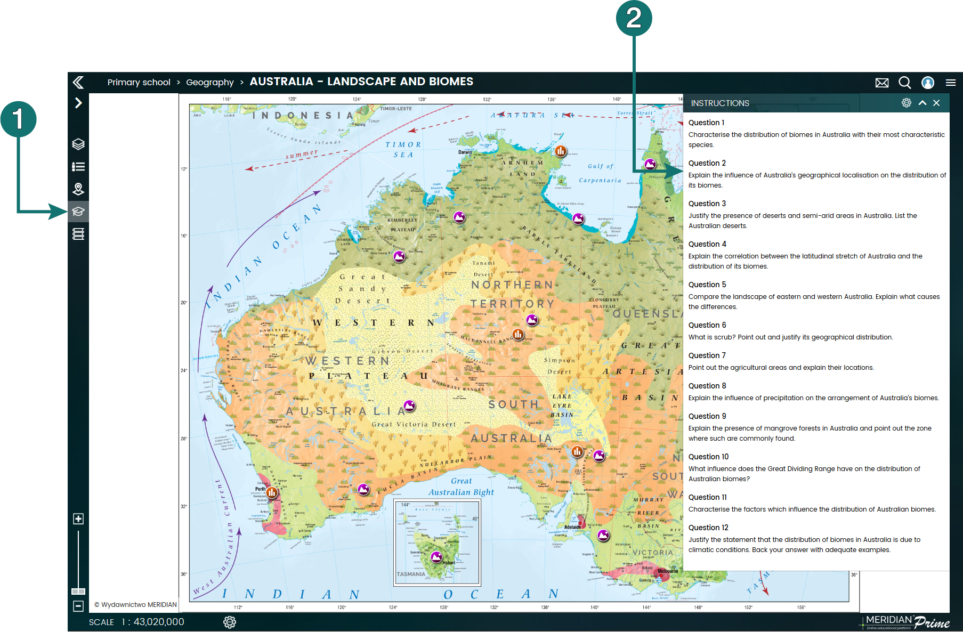
To call the Instructions module, click the icon 1 from the side menu.
This module contains questions and tasks to be performed based on a given map, prepared by methodologists and consultants 2. They can be done in class or considered as homework for students.
NOTE: The symbol (R) means that the command has been assigned to the extended level (for secondary schools).
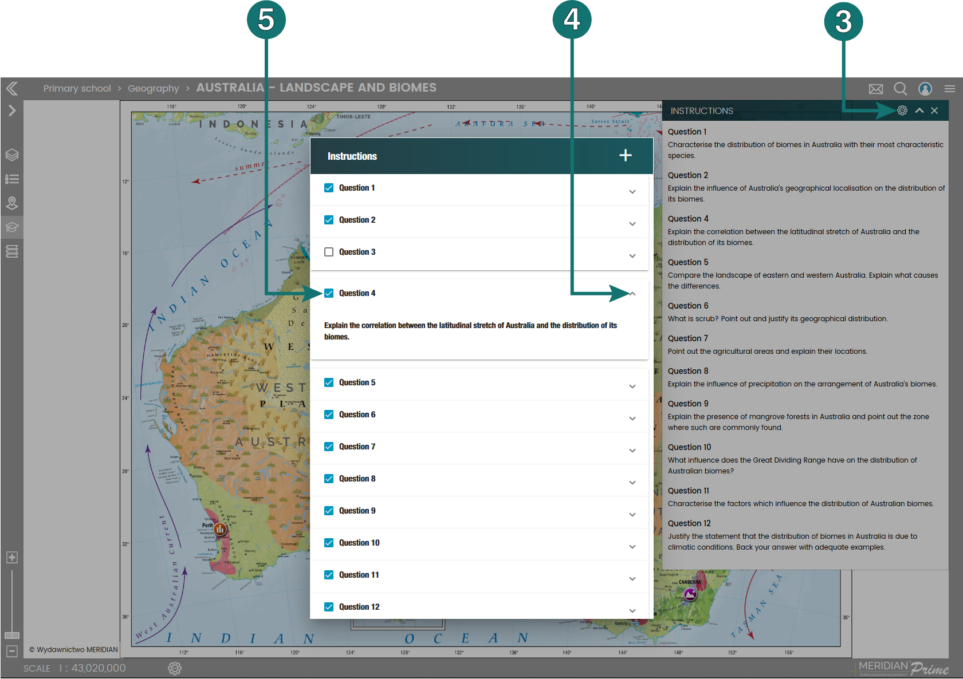
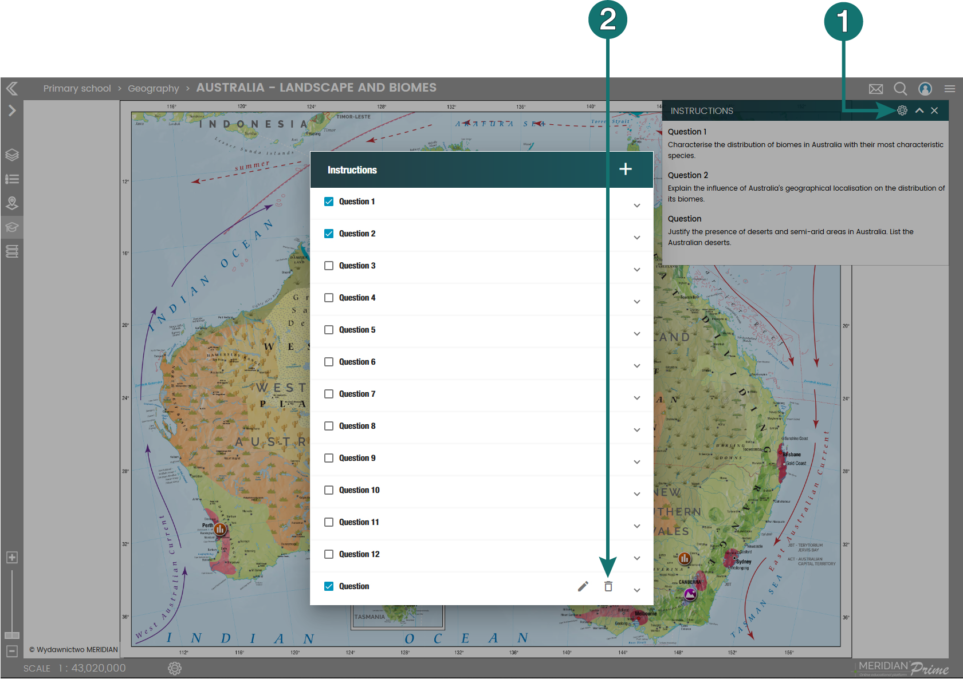
The teacher has the possibility of showing or hiding selected questions. To do this, click the icon 3 and then expand the question 4, selecting it 5 if it is to be displayed on the command list.
NOTE: Icon 3 is visible only for Teacher and School accounts. The students cannot manage the commands.
Adding your own questions to the Instructions module
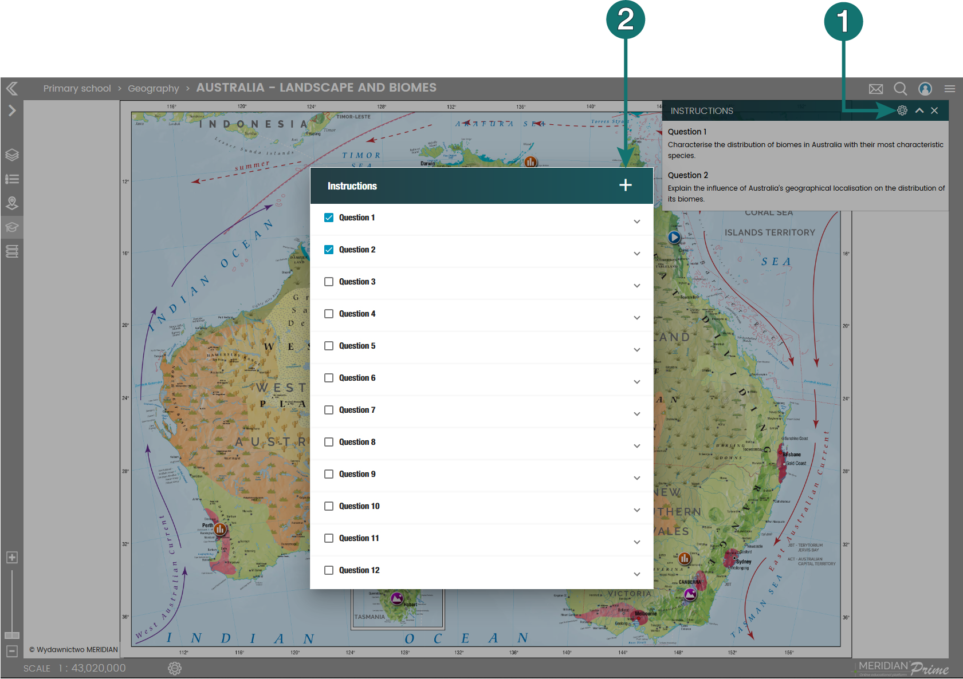
The teacher also has the option of adding his own questions. To do this, first click the icon 1 and then 2.
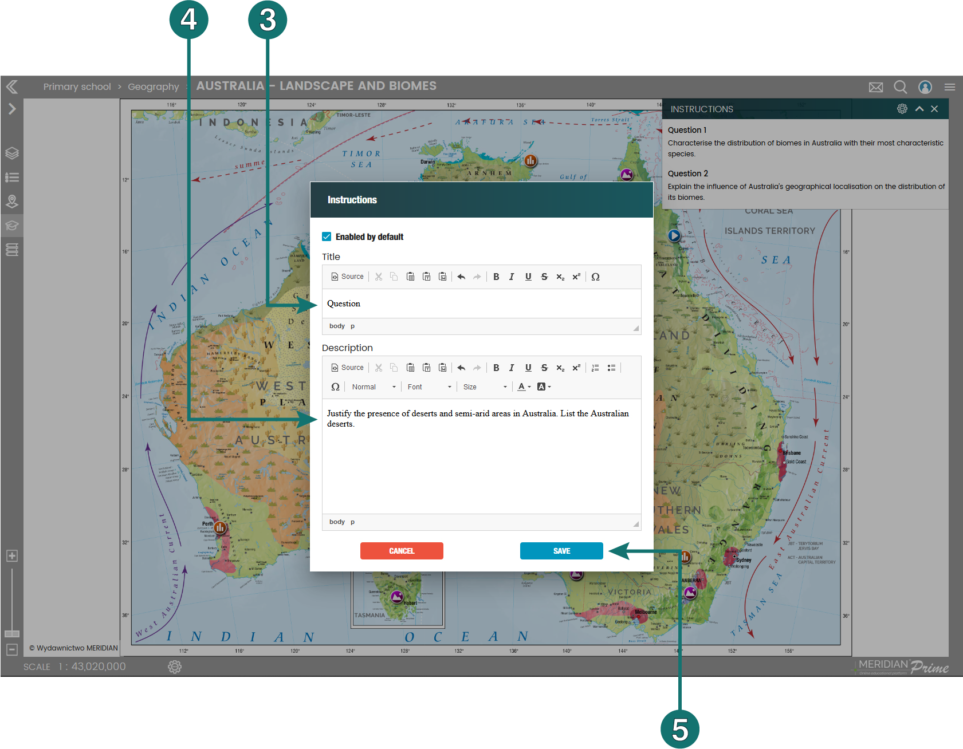
In the displayed editor enter the title of the task 3 and its content 4. The editor allows basic editing and text formatting, such as bolding, changing the font size or its color, etc.
To confirm the entered task, click the Add button 5.
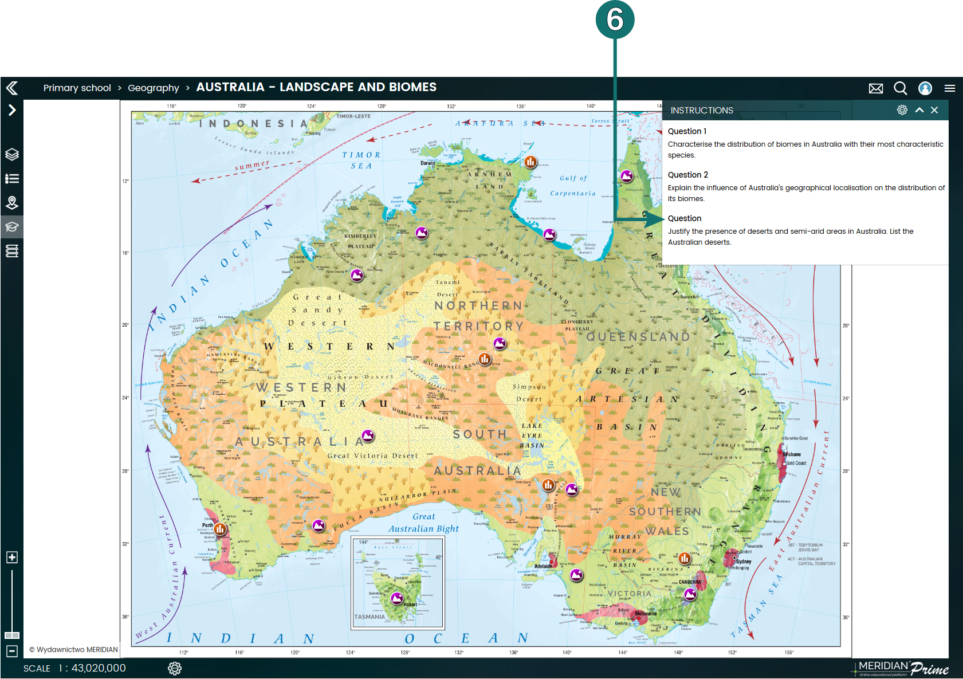
This task will be automatically marked as visible. To exit the task editor, click on any area of the screen except for the editor window, and the added tasks will appear in the current list of questions 6.
The added tasks are stored in profile information and the User can access them by logging in from any device.
Modifying the questions from the Instructions module
The questions and tasks added by the teacher can be modified by them.
To do this, first click the icon 1 and then 2.
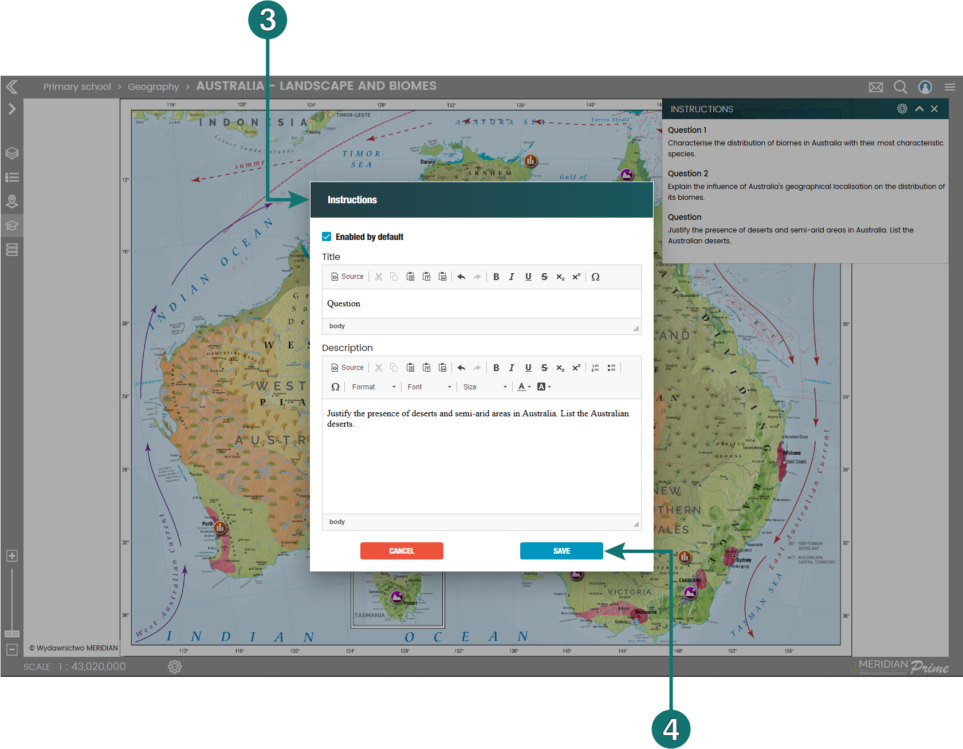
This will open an editor 3 which allows you to change the content of the task (its appearance and operation is analogous to that described in the section „Adding your own questions to the Instructions module”).
To confirm the changes, click the Save button 4.
Removing questions from the Instructions module
The questions and tasks added by the teacher may be deleted by them.
To do this, first click the icon 1 and then 2.
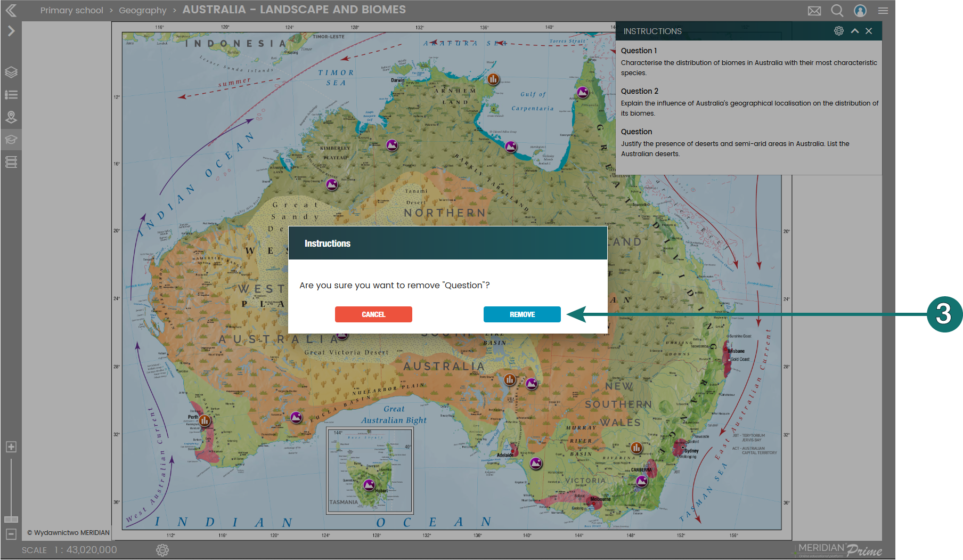
This selection should be confirmed by clicking the Delete button 3.
Map search
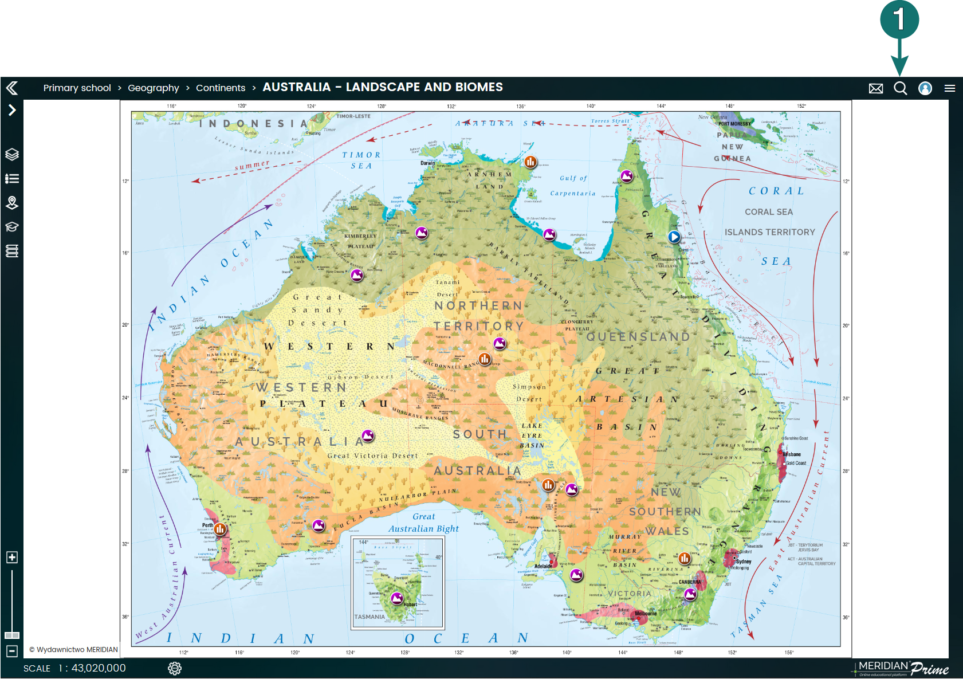
In addition to the before-mentioned standard method of selecting maps, the user can also use the map search engine. To do this, select the magnifier icon 1 from the top menu (always located in the top right corner of the browser window).
This will open a new window where we can find a map through the use of associated tags by clicking the Filter by tag field 2, or by entering the searched phrase in the Search field 3.
Entering the searched phrase in the Filter by tag field narrows down the selection list.
In order to close the search window, click the X button in the upper right corner 4.
Reloading maps
In case of incorrect map download or problems with the download itself, it is possible to download the map again without having to refresh the browser window.
To do this, open the map viewing window, click the ![]()
![]() icon and then Reload 1.
icon and then Reload 1.
Settings
The platform is designed in such a way that no additional effort from the user is required in order to display the maps correctly.
Due to the possibility of using the Platform on devices of different image display sizes, we recommend using the Settings button 1 when it comes to maps. It allows you to adjust the map scale to the size of the screen, monitor, interactive whiteboard, tablet or the image from a projector.
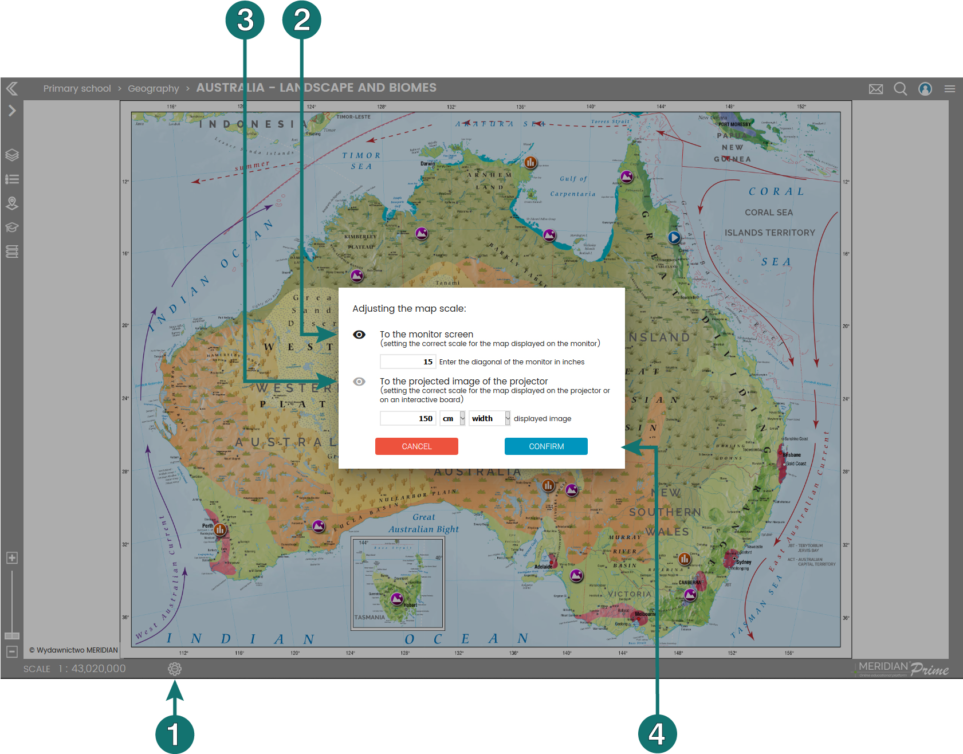
In order to do that, click the Settings button 1 in the map viewing window. This will result in a window in which you will be able to adjust the map scale.
2 Adjusting the map scale to the monitor screen: to get the correct map scale on a computer screen, enter into the text box the diagonal measurement (in inches) of the screen on which the map is being displayed.
3 Adjusting the map scale for display on a projector or an interactive board: to get the correct map scale on the image proceeding from a projector or an interactive board, enter one of the dimensions (width, height or diagonal) of the displayed image into the text box, then select the appropriate unit of measure (centimeters or inches), and specify which dimension has been entered.
To confirm the changes, click the Confirm button 4.
The default scale setting is adapted to the 15-inch monitor screen.
When displaying didactic boards, neither the scale nor the Settings button appear.
Changing profile data

After logging in, the user can change the password and edit the data related to their profile. To do this, select the ![]()
![]() icon from the upper menu, followed by Profile 1.
icon from the upper menu, followed by Profile 1.
This will open a form which allows you to view and update your data.
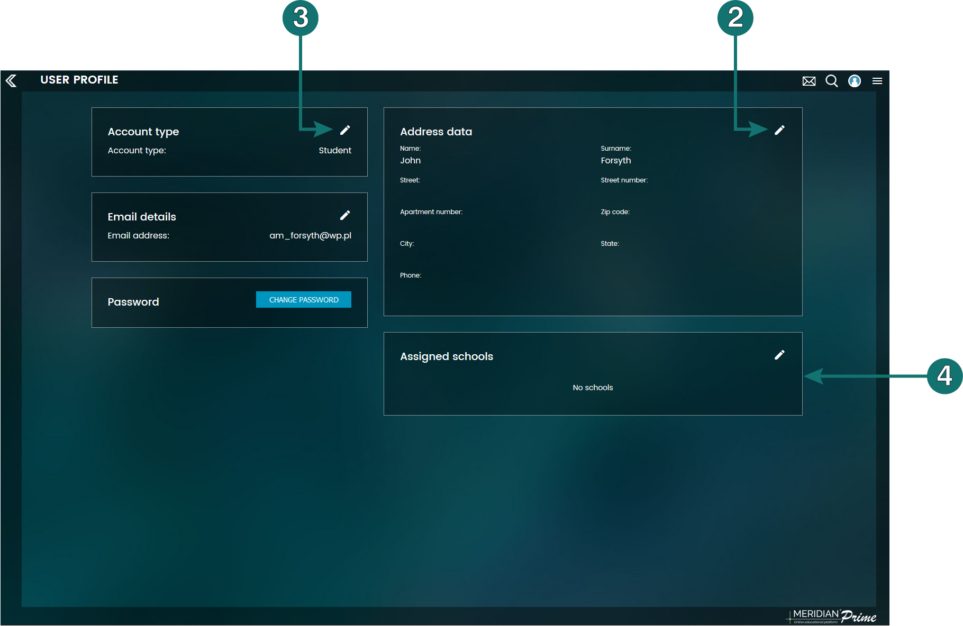
To change or complete your data, click the pencil icon 2, which will turn on the editing mode.
You also have the possibility of sending a request to change the type of your account 3 or choose your school 4.
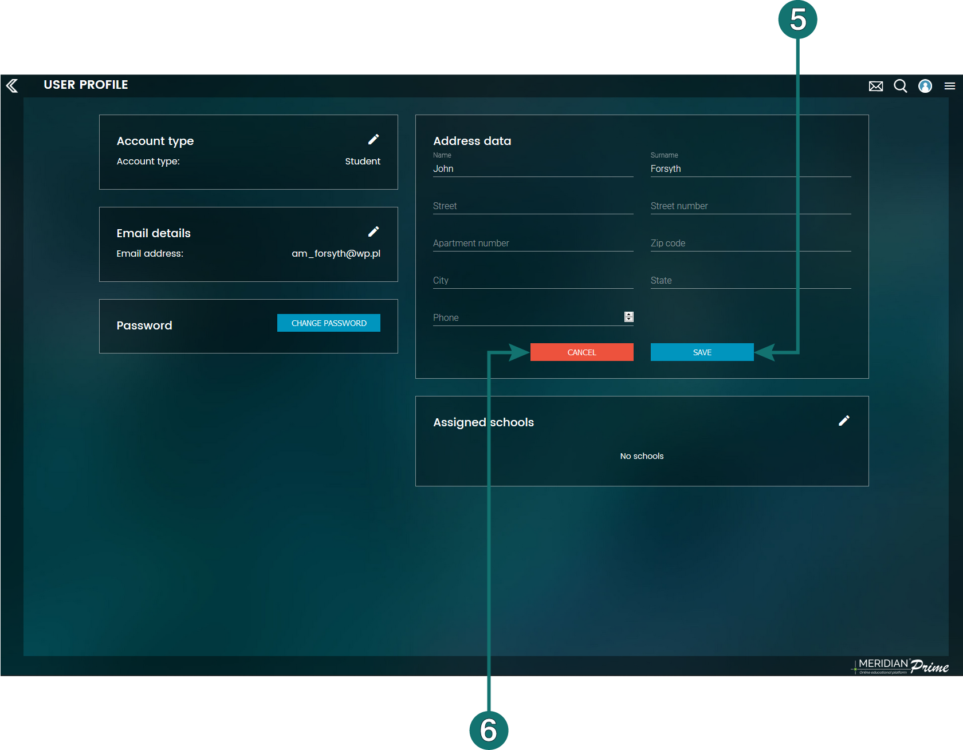
In order to save the data, click the button Save 5. If you do not wish to save the entered changes, click the button Cancel 6.
User management: the school’s view
The user logged in as an institution-for example as the headmaster-has the ability to manage users: he can invite a new teacher to use the Platform and manage the already assigned teachers (a student management function will also be added in the future).

To do this, first select the ![]()
![]() icon from the upper menu, and then Management 1.
icon from the upper menu, and then Management 1.
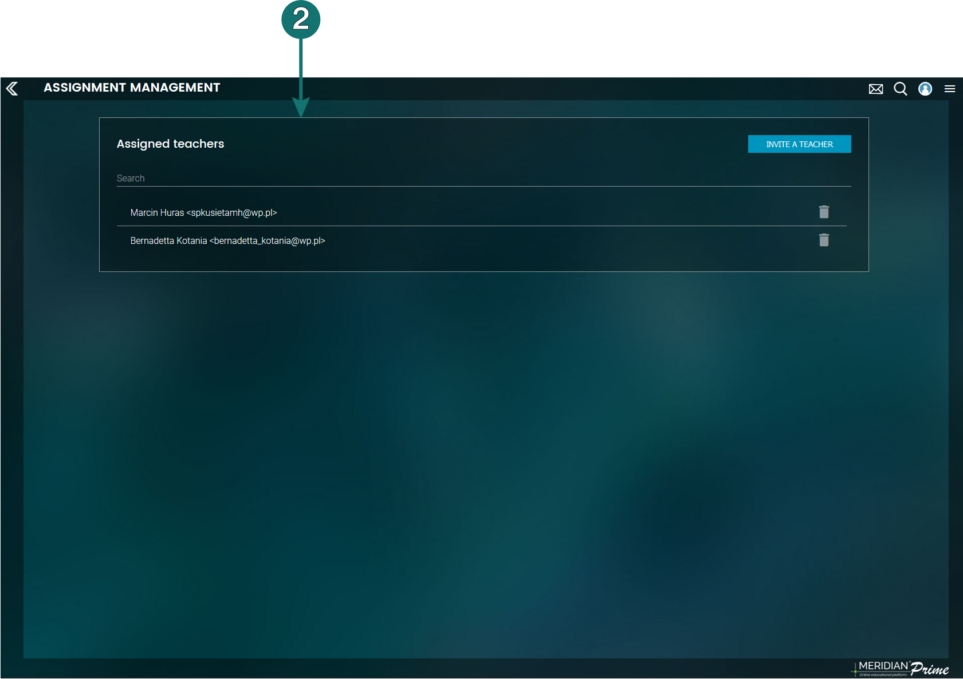
The view shows the list of teachers 2 assigned to the school.
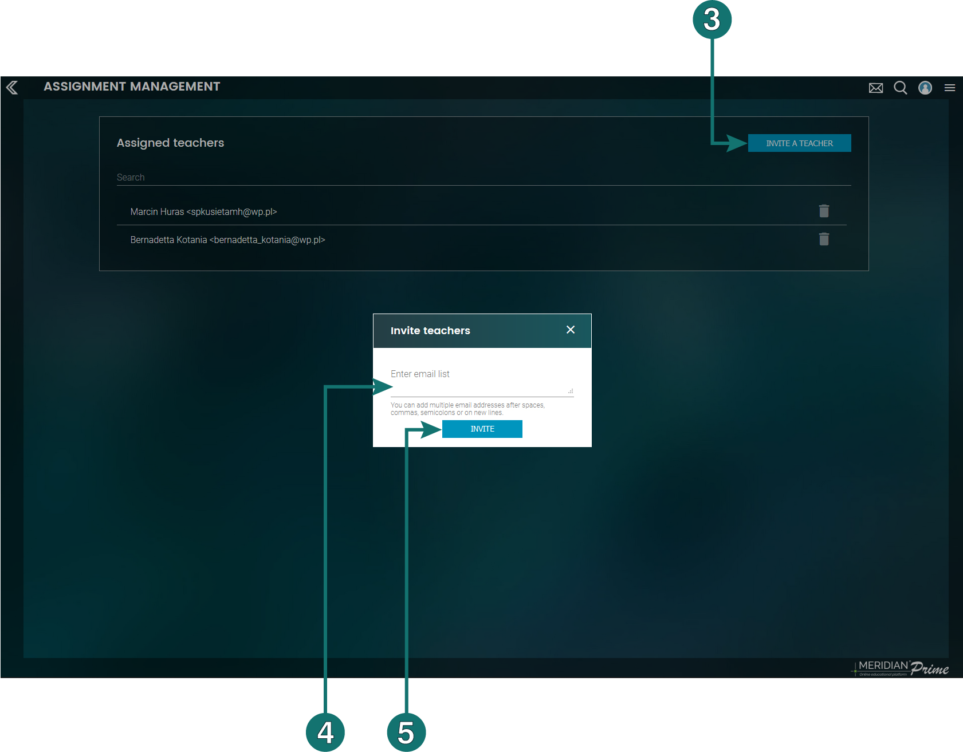
To add a new teacher, click the Invite teacher button 3 and then enter the emails to which the invitations should be sent 4. Click the Invite button 5.
If the teacher accepts the invitation, he will appear in the list of assigned teachers 2.
Management: teacher’s view

If the user is assigned to a given school as a teacher, this information will be visible in the Assigned as teacher 1 section.
You can delete the assignment at any time by clicking the garbage can icon 2.
Profile management: individual user’s view
In addition to changing the basic data, an individual user has the option of joining a school as a student.
To do this, select the icon from the upper menu and then Profile ![]()
![]() .
.
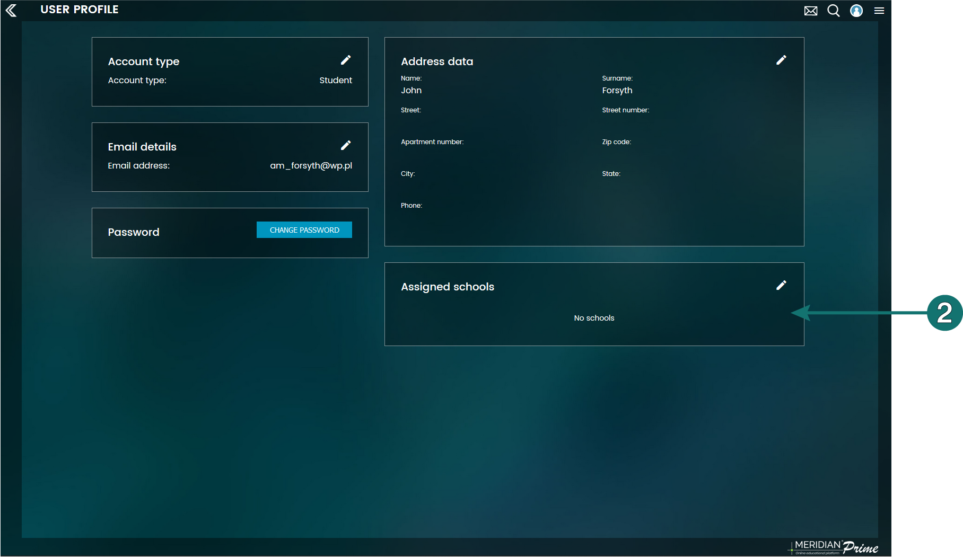
In order to join a school, enter its name into the School name field. Then, select the right school from the options available on the list 2.
Subscriptions

The users can check the state of their subscriptions. To do this, select the ![]()
![]() icon from the upper menu and click Subscriptions 1.
icon from the upper menu and click Subscriptions 1.
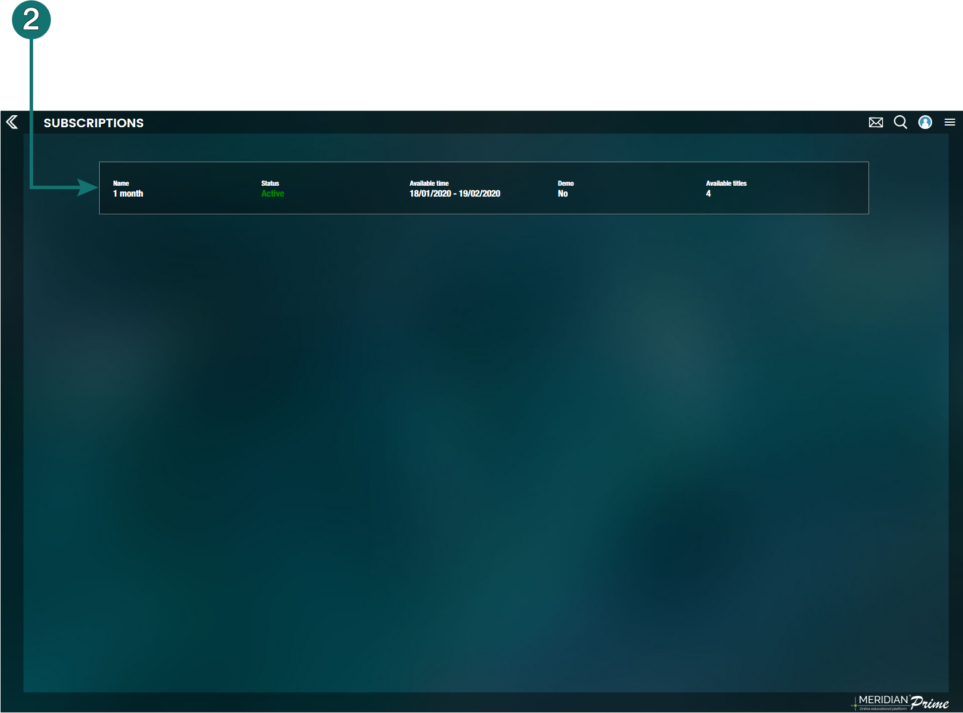
A page will appear, listing all of the subscriptions that have ever been assigned to the user’s account 2.
Map Printing

The map can be printed using the map viewing window. To do this, click the ![]()
![]() icon and then Print 1.
icon and then Print 1.
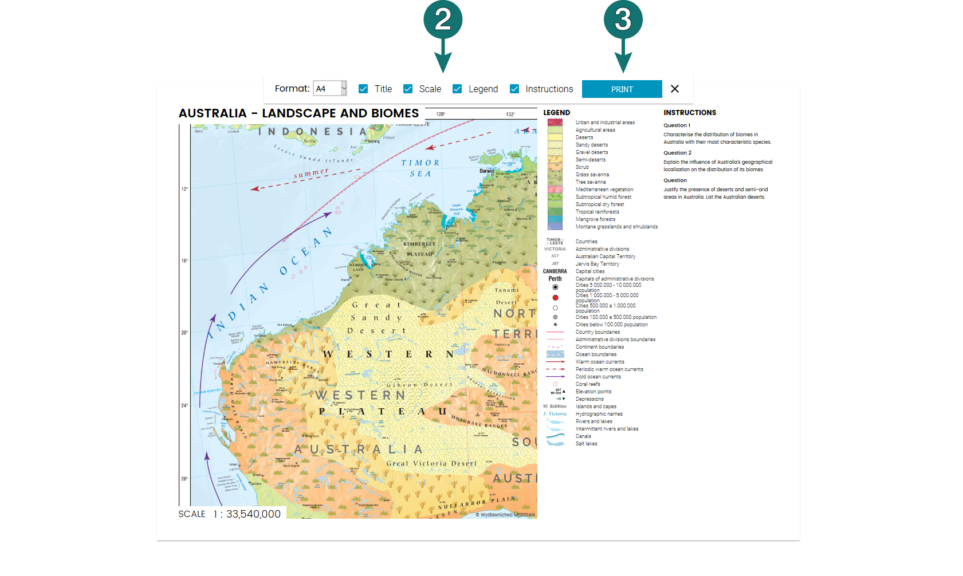
It is possible to select elements such as the map title, scale, legend or instructions, if those have been added to the map 2. Clicking the Print button 3 will display the standard print window 4 which lets us select the printer, properties or the number of copies.
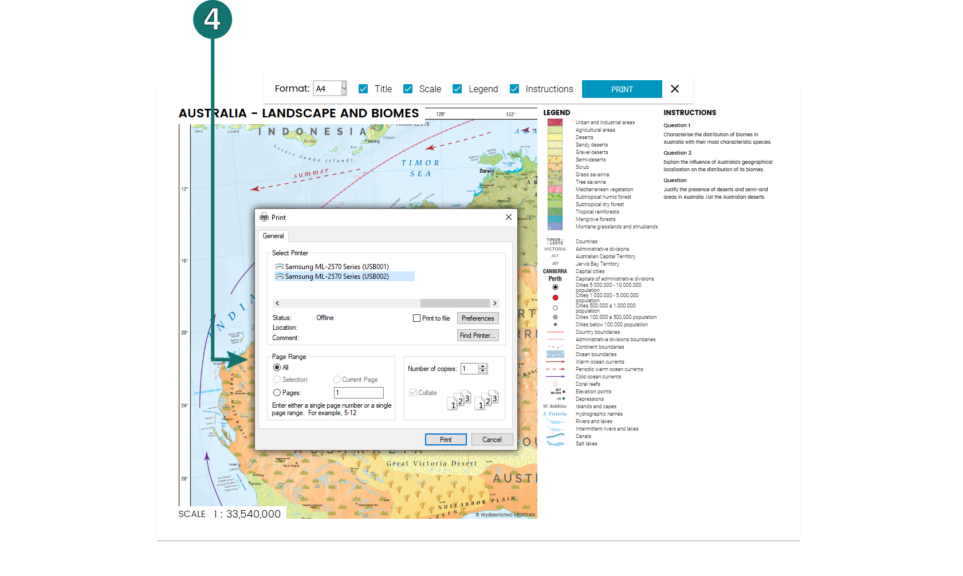
NOTE: The printed map is identical to the one that is being displayed, i.e. the map’s zoom or position, the scale and the legend will all be arranged on the printout the same way as they are on the screen. Items not visible in the legend window will not be printed. The printout will be done in A4 format.
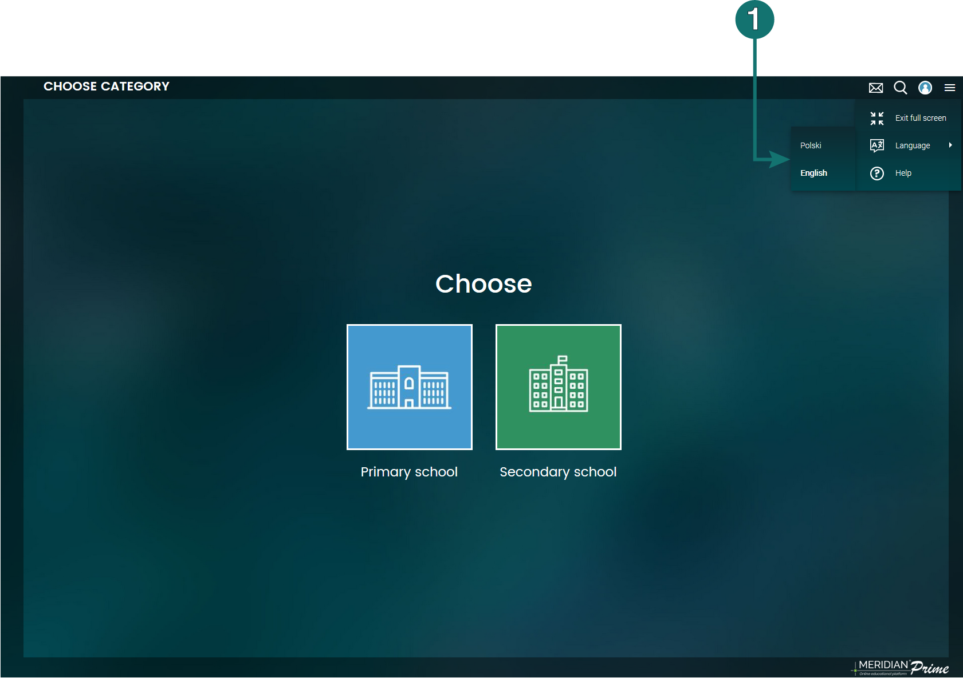
Change of language
The Platform interface can be displayed in two language versions: Polish and English. To change the language version, click the ![]()
![]() icon, following with Language. Select the appropriate language from the list 1.
icon, following with Language. Select the appropriate language from the list 1.
The platform helpdesk

At any time, the user is free to use the Platform's helpdesk. To do this, click the ![]()
![]() icon and choose Help1.
icon and choose Help1.
It will redirect you to the site with a tutorial and a FAQ section.
Recommended hardware and system requirements
Computer:
- recommended processor: minimum 2 GHz, compatible with x86 or x64
- 4 GB RAM or more
- 2 GB of free disk space
- operating system: irrelevant
- Supported browsers:
- Chrome 73+ version
- Opera 59+ version
- Firefox version 65+
- Safari version 12+
Android devices (multimedia monitors / smartphones / tablets):
- 3 GB RAM or more
- min 2x cores / 2 GHz processors
- min 2 GB of free space
- Chrome browser version 73+